
Whisper Local User Guide
The flow from preparing a model to transcribing, editing and exporting. Installation steps are on the download page.
App interface: Japanese. Japanese labels are shown in parentheses, for example Settings (設定).
Getting started
Whisper Local is an app that turns speech into text only on your Mac, using OpenAI Whisper models (Core ML versions). Once you have prepared a model, transcription works offline from then on.
First, let’s prepare one model in the setup guide.

Prepare a model in the setup guide
The setup guide opens on first launch. It goes in this order: Welcome → Language → Model → Speakers → Export → Try → Done (ようこそ → 言語 → モデル → 話者 → 書き出し → 試す → 完了).
- Language (言語): choose the language of the audio you will transcribe.
- Model (モデル): press “Prepare this model” (このモデルを準備する) to download the model and make it ready to use. On macOS 26 or later you can also choose “Mac built-in speech recognition (no download)” (Mac標準の音声認識(取得不要)) and continue without downloading a model (you can prepare Whisper later on the “Model” (モデル) tab in Settings).
- Speakers (話者): if you want to use speaker labels, press “Prepare speaker model” (話者モデルを準備する) (about 11 MB). If not, leave it off and continue.
- Export (書き出し): choose the save format by purpose (minutes and notes, organizing in a spreadsheet, video subtitles, YouTube subtitles).
- Try (試す): actually transcribe with “Try with sample audio” (サンプル音声で試す) or “Try with your own file…” (自分のファイルで試す…).
- Done (完了): press “Start using” (使い始める) to finish.
You can also stop partway with “Set up later” (あとで設定する). You can open the guide again at any time from “Setup Guide…” (セットアップガイド…) in the menu or “Open Guide” (ガイドを開く) on the “Model” tab in Settings.
Choosing a model
| Model | Size | Best for |
|---|---|---|
| Large v3 Turbo (default) | About 1.6 GB | Many languages, including Japanese |
| Turbo Compact | About 650 MB | When you want to save space |
| Base English | About 150 MB | English only (English-only model) |
Under “Diagnostics” (診断) in Settings, you can measure the speed with your own audio.
With Whisper, the first time only, the model is converted for this Mac, which takes from a few minutes to about 10 minutes. Progress is shown on screen, so please wait. After that it takes much less time.
Basics
File transcription
- Drop an audio or video file onto the window (you can also choose one with “Open File…” (ファイルを開く…) ⌘O in the menu).
- Press “Start Transcription” (文字起こしを開始) (⌘↩).
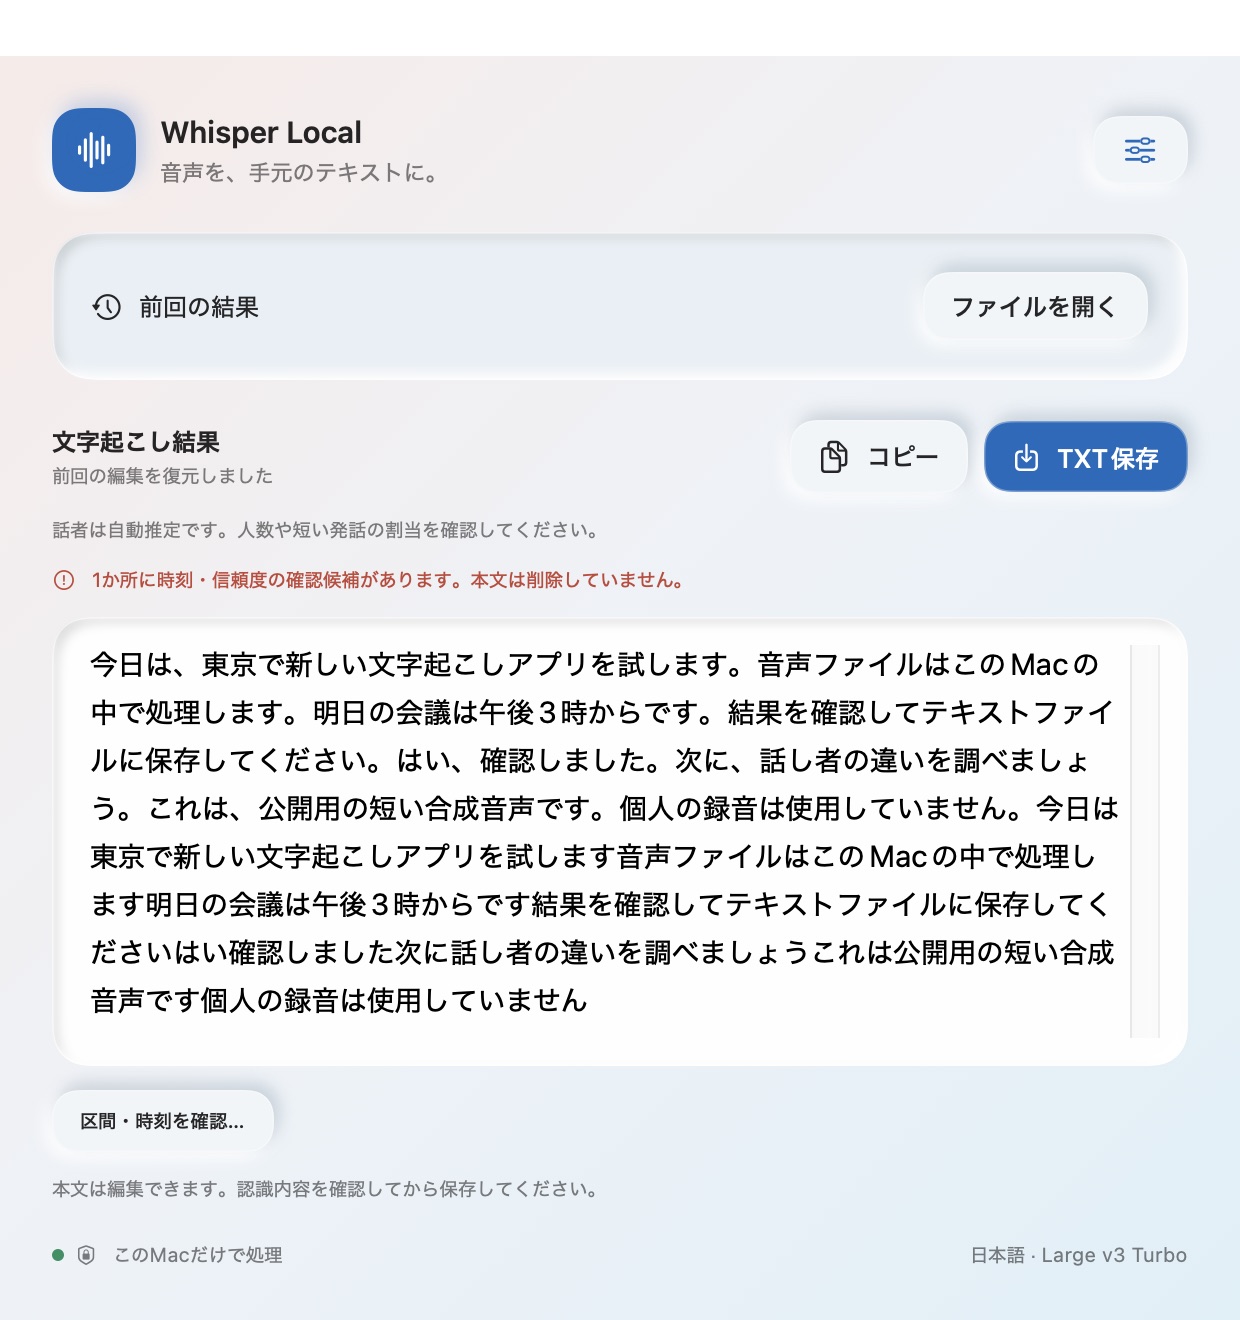
- When it finishes, the result is shown. You can correct the text right there, copy it, or save it with “Save Result…” (結果を保存…) (⌘S).
You can keep using the window while it is processing, and you can cancel at any time.
- Formats: WAV, M4A, MP3, MP4, MOV and other formats macOS can read
- Length: up to 2 hours per file (split longer files)
- Languages: Japanese, English, auto-detect and many other languages. During processing, the language being transcribed is shown (with auto-detect, the language detected most often across segments becomes the language of the result)
Choosing the engine
Choose it under “Engine” (変換エンジン) in “Transcription” (文字起こし) on the “Model” tab in Settings. Both process only on this Mac, and speaker labels, segment review, subtitles and the dictionary work with both.
- Whisper (accurate, multilingual) (Whisper(高精度・多言語)): the default. Processes with the downloaded model and supports about 100 languages and automatic language detection. Segments where it repeats the same words are reprocessed automatically.
- Mac built-in speech recognition (fast) (Mac標準の音声認識(高速)): macOS 26 or later. No Whisper model download or first-time conversion is needed (the first time you use a language, macOS downloads the data for that language). It cannot detect the language automatically, so “Auto-detect” (自動検出) transcribes in this Mac’s language. It supports fewer languages than Whisper.
In one measured example, processing a video of about 10 minutes took about a minute and a half in total (varies with the Mac’s performance).
Live transcription
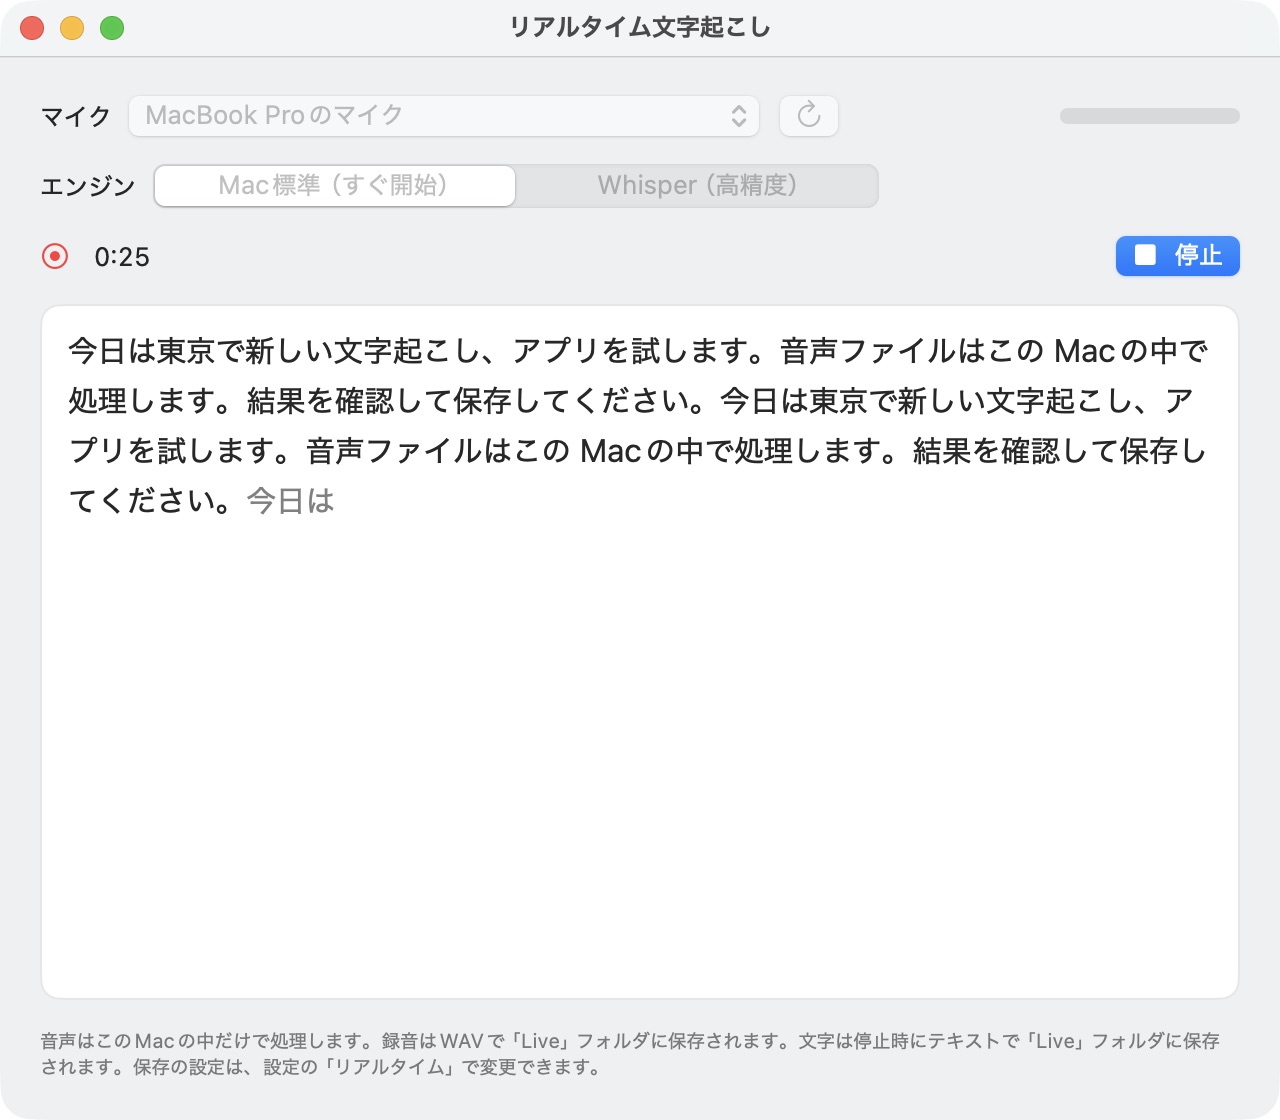
- Open it with the microphone button at the top right (⌘⇧R).
- Choose a microphone (the default is “Use system setting” (システムの設定に従う)) and an engine, press “Start” (開始) (⌘↩) and speak.
- The first time, you are asked for permission to use the microphone; choose “Allow”.
- Finish with “Stop” (停止) (⌘↩).
Confirmed text is shown in the normal color, and text still in progress in a lighter color. The microphone is used only between “Start” and “Stop”.
Choosing the engine
- Mac built-in (starts instantly) (Mac標準(すぐ開始)): starts as soon as you press it, and text appears almost as you speak. Available on macOS 26 or later.
- Whisper (accurate) (Whisper(高精度)): when accuracy matters. It takes a few seconds to start, and 1–3 minutes the first time right after installing or updating. Recording starts immediately, and once it is ready, what you said until then is also transcribed.
On Macs with a macOS version earlier than 26, the engine selector is not shown and Whisper is used.
Dictionary replacement and the punctuation setting also apply to live transcription. After stopping, you can use “Copy” (コピー), “Show Recording in Finder” (録音をFinderで表示) and “Transcribe Recording Accurately” (録音を高精度で文字起こし). “Transcribe Recording Accurately” reprocesses the recording the same way as file transcription (with the engine set in Settings), and you can also use speaker labels and save subtitles.
Saving recordings and texts
By default, recordings (WAV) and texts are saved in ~/Library/Application Support/WhisperLocal/Live. The text is saved when you press “Stop”. Under “Live” (リアルタイム) in Settings, you can set, separately for recordings and texts, whether to save them, where to save them (such as “Documents”), and automatic deletion of old items (items older than 7–90 days are moved to the Trash; off by default, with a period of 30 days). With “Clean Up Now” (今すぐ整理), you can move items past the period right away.
Dictation (in any app)
Whatever app you are using, such as mail, chat or an AI prompt, you can put spoken words in at the cursor (0.3.20 or later).
- Click the field where you want to type, to place the cursor.
- Press ⌥End. On keyboards without an End key, it is ⌥fn→. A dark band appears at the bottom of the screen and shows what you say. The waveform in the band moves with your voice, so you can check that the microphone is picking up your voice (it turns red if the sound is loud enough to distort).
- When you finish speaking, press ⌥End again. The text is typed at the cursor.
To cancel, press esc or the × on the band. You can drag the band to move it, and it appears in that position from then on. The key can be changed under “Dictation” (音声入力) in Settings.
Only once at first: Accessibility permission
To type into other apps, the macOS “Accessibility” permission is needed. Press “Allow…” (許可する…) under “Dictation” in Settings, and turn on Whisper Local in the list in System Settings that opens. Until the permission is given, the text is only copied to the clipboard (you can paste it with ⌘V).
Styles for the typed text
- As is (そのまま) (default): types the recognized text as it is.
- Record (記録): does not change any words; only tidies spaces and doubled punctuation.
- Tidy (整える): removes fillers such as “えーと” and “あのー” (um, uh). Ordinary words such as “あの店” (that shop) and “その件” (that matter) are kept.
You can also tidy the text for a purpose with the Mac’s built-in AI (Apple Intelligence, on macOS 26 or later when it is turned on) (0.3.21 or later). Processing is done only on this Mac.
- AI prompt (AIへの指示): removes fillers and false starts, for a prompt you send to an AI. Background, reasons and conditions are all kept, and explanations, requests and questions keep their form (example: “えーと、うちのチームは今週リリースを控えてて、あの、テストが追いついてないんだけど、何からやればいいか提案して” → “うちのチームは今週リリースを控えていて、テストが追いついていない。何からやればいいか提案してください。”; roughly, “Um, our team has a release this week, and, uh, testing isn’t keeping up, so suggest where to start” becomes “Our team has a release this week, and testing is not keeping up. Please suggest where to start.”).
- AI prompt (outline) (AIへの指示(項目立て)): organizes the prompt you send to an AI into “【依頼内容】” (Request) and “【制約条件】” (Constraints). Only the conditions you spoke are listed with “・”, and if you did not speak any conditions, only 【依頼内容】 is typed (0.3.24 or later. Example: “リモートワークについてのコンテンツを作ってほしいんだけど、箇条書きで3点にまとめて、専門用語は使わずに、500文字くらいで” → “【依頼内容】リモートワークについてのコンテンツをまとめてください。【制約条件】・箇条書きで3点にまとめる ・専門用語を使わない ・文字数は500文字程度”; roughly, a request for content about remote work becomes a Request line plus the Constraints “3 bullet points”, “no jargon” and “about 500 characters”).
- Mail (メール): turns the text into polite sentences and splits it into paragraphs. Greetings and signatures are included only when you spoke them.
- Chat (チャット): makes short, natural conversational sentences.
- Search (検索): turns it into words for a search box (example: “渋谷で安いランチの店を探してるんだけど” → “渋谷 安い ランチ”; roughly, “I’m looking for a cheap lunch place in Shibuya” becomes “Shibuya cheap lunch”).
- Custom (カスタム): tidies the text following the instruction you wrote in Settings.
When the app judges that the AI result strays from what you said (it answered a question, added something you did not say, left out something you said, turned an explanatory sentence into a request, and so on), it asks the AI once more (0.3.28 or later). If the result still cannot be used, it types the “Tidy” text instead of the AI result and shows the reason on the band. When only part of a long text cannot be used, only that part is replaced with the “Tidy” text. With “Custom”, rewrites such as bullet lists and summaries also go through. The instruction field shows a guide to the instruction length that the built-in AI follows more easily. The AI instruction for each style can be rewritten under “Dictation” in Settings; it is used once you press “Save” (保存), and “Reset to Default” (初期値に戻す) restores it. While a rewritten instruction is in use, Settings shows “Using a rewritten instruction” (書き換えた指示を使用中) and the style list shows “(rewritten)” ((書き換え)). When an update brings a new default instruction, Settings tells you (you can switch with “Use the new default” (新しい初期値にする)).
Dictionary replacement is applied with every style. Even while speaking, you can switch with the “Style” (スタイル) pop-up menu on the band, or with ⌥↓ (next) and ⌥↑ (previous) (these two keys work only while you are speaking).
Setting a style for each app
Under “Dictation” → “Per-app settings” (アプリごとの設定) in Settings, you can set the style and input method for each app (0.3.22 or later). For example, if you set “Mail” for your mail app, “Chat” for Slack and “AI prompt” for AI apps, you can use them without switching. Choose a running app or an app in the Applications folder from “Add App” (アプリを追加). When you start dictation in that app, the band shows “For …” (〇〇用). If you change the style on the band while speaking, it is remembered as the style for that setting.
When you use many sites in one app, as in a browser, you can add the same app as many times as you like and separate them with “Word in the window title” (窓のタイトルに含む語) (0.3.28 or later). For example, add Safari twice, set the one with the word “ChatGPT” to “AI prompt” and the one with “Gmail” to “Mail”, and the style switches to match the tab. When no word matches, the setting with an empty word is used. Which setting is used is decided by the app and window in front when you finish speaking.
Rules it follows when typing
- The clipboard used for pasting is restored to its original contents after a short wait.
- If you switch to another app while speaking, the text is only copied, not typed (this can be changed in Settings).
- Text is not typed into protected input, such as password fields.
- Recordings and texts are not saved to files. Only the last 20 texts are kept as history, and you can copy them or type them again from “Dictation” in Settings or from the menu bar icon. You can also choose not to keep history.
- To be able to use it at any time even after closing the window, it is handy to turn on “Stay in the menu bar when the window is closed” (ウインドウを閉じても常駐する) under “Integration” (連携) in Settings.
Editing and exporting
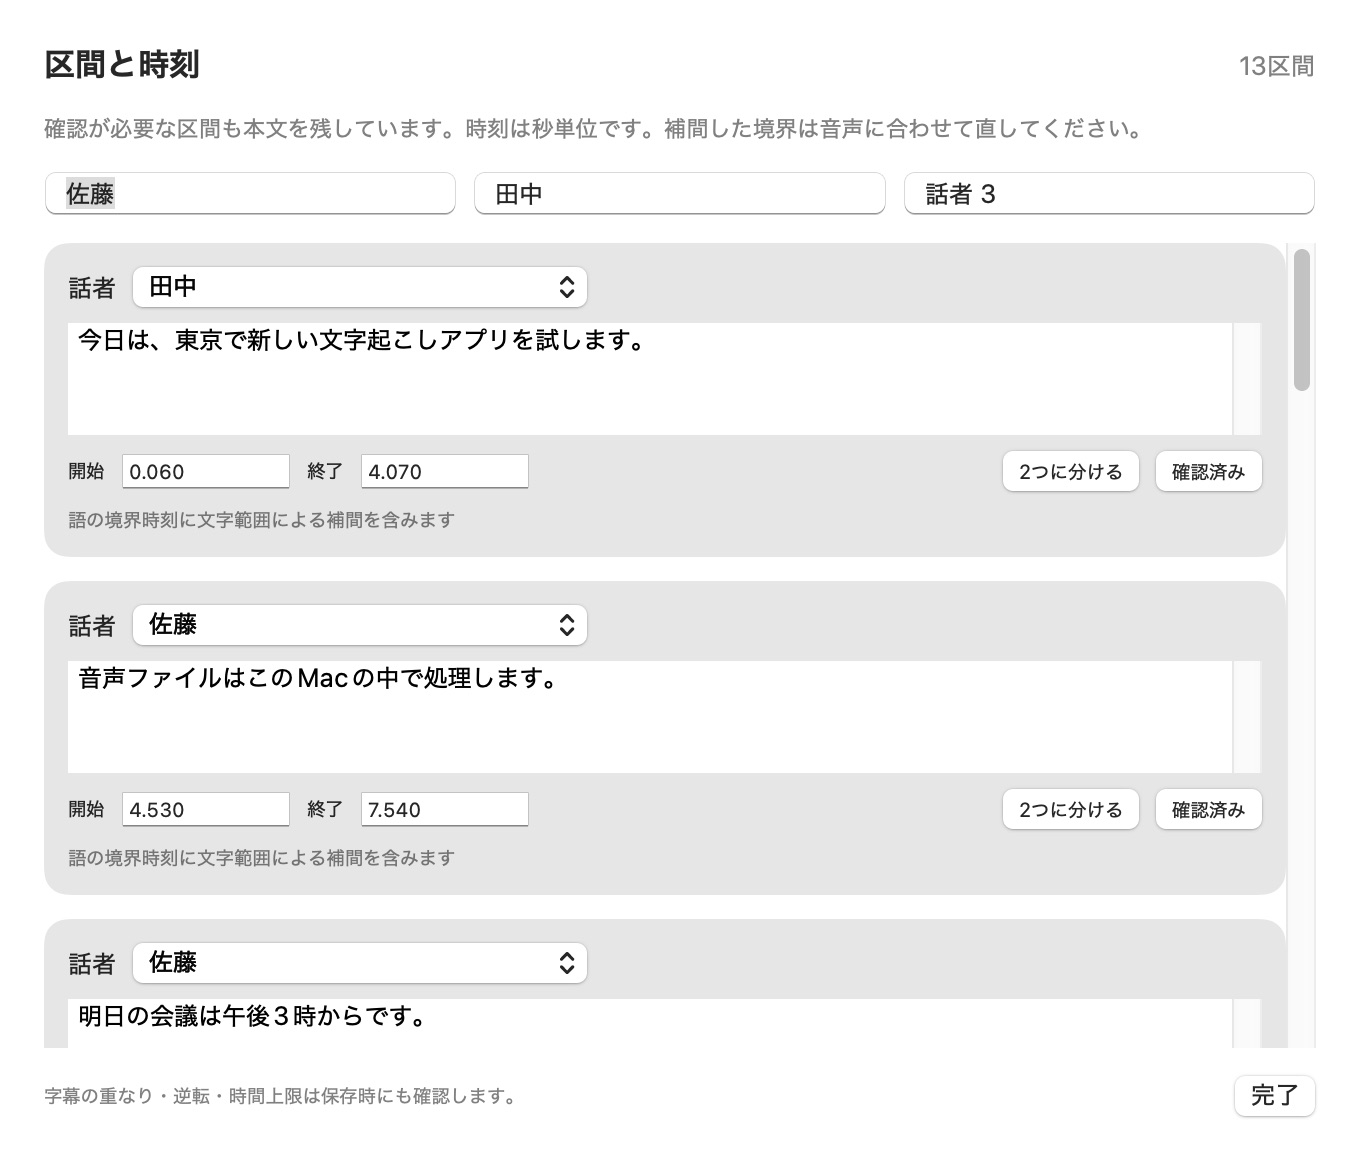
From “Review Segments and Times” (区間・時刻を確認) in the result window, you can edit the text, start and end times, and speaker of each segment.
- Split a segment in two, and correct times to the second
- Rename a speaker everywhere at once (for example, “話者 1” (Speaker 1) → “佐藤” (Sato))
- Segments that need review show a “Review and Confirm” (確認して確定) button. Check the times and press it to mark the segment “Reviewed” (確認済み). If you change the text or times, it needs review again
Export formats
There are 5: TXT, CSV, SRT, VTT and SBV. On the “Output” (出力) tab in Settings, either use “Choose by purpose” (目的から選ぶ) (minutes and notes / organizing in a spreadsheet / video subtitles / YouTube subtitles), or choose the “Save format” (保存形式) and “Split by” (区切り方) directly. You can split “By sentence” (文ごと), “By number of words” (語数ごと) (1–30 words) or “By seconds” (秒数ごと) (0.5–10 seconds, in 0.5-second steps). When speaker labels are on, the text is also split where the speaker changes. You can check a preview of the saved file, and apply the setting to the current result with “Re-split the displayed result with this setting” (表示中の結果をこの設定で区切り直す). With the “▼” to the right of the save button in the result window, you can change the save format for the displayed result only (the default in Settings does not change). Pressing “Clear” (クリア) clears the displayed result and returns to the first screen (the result is kept in the history).
- When saving in a subtitle format (SRT, VTT, SBV), if there are unconfirmed segments, or times that are reversed, overlapping, out of range or over the seconds limit, the app asks you to check instead of exporting silently. The original text is always kept.
- CSV is saved as UTF-8 (with BOM), so it opens as is in Excel and Numbers. An apostrophe is added before leading characters that would be interpreted as a formula.
History and auto-save
The original recognition results and your edits are saved on this Mac. Even if you close the app, the previous result and edits are restored the next time you open it. On the “History” (履歴) tab in Settings, you can reopen earlier results with “Show” (表示). “Delete History…” (履歴を削除…) deletes all history (audio files, exported files and models are not deleted).
Speaker labels
On the “Speakers” (話者) tab in Settings, turn on “Identify speakers” (話者を識別する) and press “Prepare speaker model” (話者モデルを準備) (about 11 MB, first time only); then transcriptions are split by speaker. Speaker names such as “[話者 1]” ([Speaker 1]) are added to the result. You can rename speakers and correct assignments in “Review Segments and Times”. Changes apply to every export format.
The number of speakers and the assignments are estimates. They can be wrong for short acknowledgments or where people speak at the same time (in one example, a conversation between 2 people was estimated as 3). Check the results before using them.
- Specify the number of speakers: with “Number of speakers” (人数) under “Speakers” in Settings, you can specify the number of people in the conversation (2–8). Specifying it when you know the number reduces speaker mix-ups. If you don’t know, leave it at “Estimate automatically” (自動で推定) (0.3.16 or later).
- When speaker labels are on, the speaker model is prepared in the background when the app launches and when you turn the option on. So even the first transcription starts without waiting.
Dictionary
Register words that are often misrecognized as “wrong → right” under “Dictionary” (辞書) in Settings, and they are replaced automatically when transcription finishes.
- You can edit them in bulk with “Import CSV…” (CSVを読み込む…) and “Export CSV…” (CSVに書き出す…) (one “wrong,right” pair per line; in the third column you can write 1 for enabled or 0 for disabled).
- Before you edit the text, you can go back to the result before replacement with “Undo Replacements” (置き換え前に戻す) in the result window.
- With “Apply to Displayed Result” (表示中の結果に適用), you can also apply the replacements to the result currently shown.
- Replacement itself can be turned on and off with “Replace with the dictionary when transcription finishes” (文字起こしの完了時に辞書で置き換える). It also applies to requests from other apps.
- It also applies to live transcription and dictation.
- For registered words of 4 or more characters, variations in katakana spelling (with or without “ー”, as in “イーブンリアリティー” and “イーブンリアリティ”, or small “ィ”, as in “ウイスパー” and “ウィスパー”) are treated as the same word and replaced (0.3.23 or later). Mishearings that sound different, such as “サベラ” and “サペラ”, should each be registered on a separate line.
The dictionary does not consider context. It is not suited to homophones where either word could be correct (such as 講演 (lecture) and 公園 (park)).
Punctuation
For spoken Japanese, which tends to come out with little punctuation, the app adds “、” and “。” based on pauses and sentence endings. It does not add them after English or other non-Japanese words. The recognized words themselves are not changed. It can be turned on and off in Settings, and it also applies to live transcription. With Mac built-in speech recognition, the punctuation added by macOS is used, and turning this off removes “、” and “。”.
Settings
The tabs of the Settings window (“Settings…” (設定…) in the menu) and their main items. Press the “?” next to an item to see an explanation right there.
| Settings item | What you can do |
|---|---|
| Model (モデル) | Setup guide (“Open Guide” (ガイドを開く)) / Updates (“Check for updates automatically” (アップデートを自動で確認する) = turn the check after launch and once a day on or off; “Check Now” (今すぐ確認)) / Transcription (engine, audio language, “Add punctuation (、。) automatically” (句読点(、。)を自動で入れる)) / Models and preparation (download, “Use this model” (このモデルを使う), re-download and delete from “Manage” (管理)) |
| Diagnostics (診断) | Measure the speed with your own audio using “Choose Audio and Measure…” (音声を選んで測定…) |
| Speakers (話者) | “Identify speakers” (話者を識別する), “Number of speakers” (人数) (Estimate automatically / 2–8), preparing the speaker model |
| Output (出力) | “Choose by purpose” (目的から選ぶ), “Save format” (保存形式), “Split by” (区切り方), a preview of the saved file |
| Dictionary (辞書) | Registering “wrong → right”, turning replacement on and off, importing and exporting CSV |
| Live (リアルタイム) | Turning saving of recordings and texts on and off, the save folder, automatic deletion of old items (7–90 days) |
| Dictation (音声入力) | “Dictate with a shortcut” (ショートカットで音声入力する), “Start/stop key” (開始・終了のキー) (default ⌥End), the default style and how the AI tidies the text, per-app settings (style and input method), engine, input method (paste / keystrokes), “Restore the original clipboard” (元のクリップボードに戻す) and the wait time, “Type only when the starting app is in front” (開始したアプリが前面のときだけ入れる), Accessibility permission status, history |
| History (履歴) | “Show” (表示) saved results and “Delete History…” (履歴を削除…) |
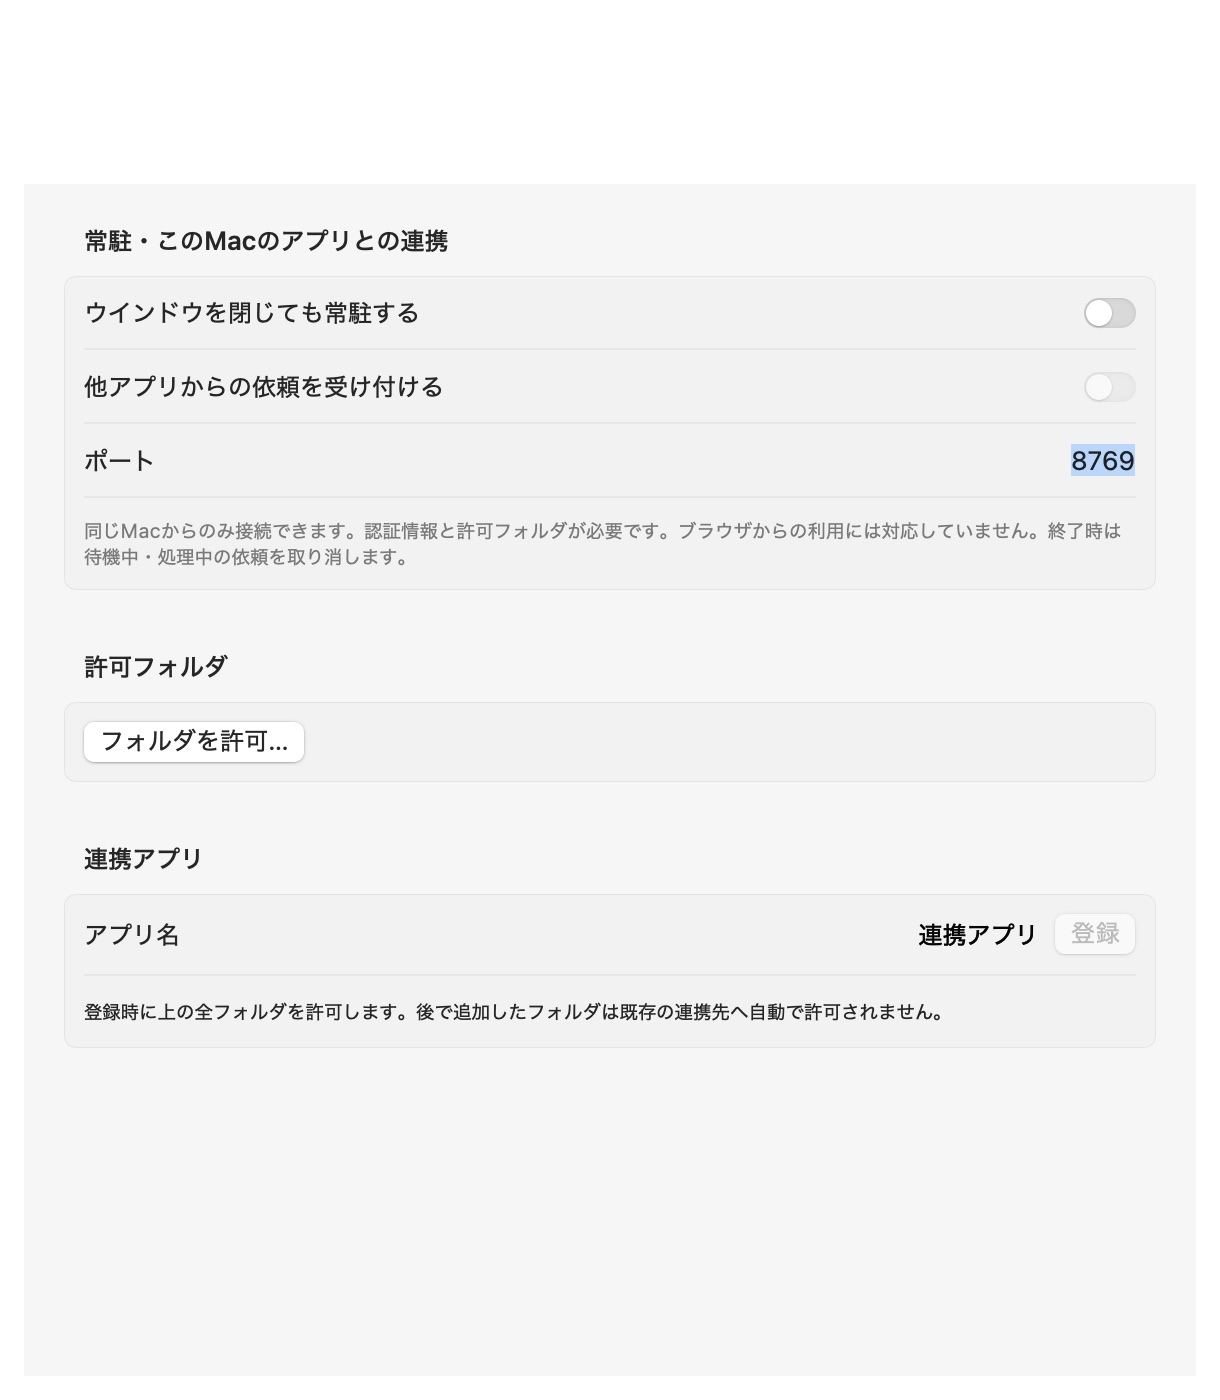
| Integration (連携) | “Launch at login to the Mac” (Macへのログイン時に自動で起動する), “Stay in the menu bar when the window is closed” (ウインドウを閉じても常駐する), accepting requests from other apps, allowed folders, registering connected apps |
Staying in the menu bar, and working with other apps
Turn on “Stay in the menu bar when the window is closed” under “Integration” in Settings, and the app stays in the menu bar and can accept transcription requests from apps you allow on the same Mac. From the menu bar icon you can choose “Open Window” (ウインドウを開く), “Live Transcription…” (リアルタイム文字起こし…), “Settings…” (設定…), “Check for Updates…” (アップデートを確認…) and more.
- Connections are accepted only from inside the same Mac (
127.0.0.1). Browsers cannot connect. - Credentials for each connected app are stored in the keychain.
- Only files inside the folders you allow can be read.
Connecting icRec and other apps with a single confirmation (0.3.15 or later)
When you press “Whisper Local と連携する” (Connect to Whisper Local) in a connected app such as icRec, Whisper Local shows a confirmation asking “「icRec」と連携しますか?” (Connect with “icRec”?). Check the folder to be read and the app that made the request (whether it is from the same developer), then press “連携する” (Connect); staying in the menu bar, folder permission, registration of the connected app and accepting requests are all set up automatically. There is no need to copy IDs or tokens by hand.
- If you get a request you don’t recognize, or the app says it cannot verify the app that made the request, press “Cancel” (キャンセル).
- If you connect again with the same app, the earlier registration becomes invalid and is replaced by the new one.
- To set it up yourself, under “Integration” in Settings turn on “Stay in the menu bar when the window is closed” → “Allow Folder…” (フォルダを許可…) → “Add Connected App…” (連携アプリを追加…) (note the credentials shown) → turn on “Accept requests from other apps” (他アプリからの依頼を受け付ける), then enter the credentials in the connected app.
- When launched in the background from a connected app, the app also starts in the menu bar without opening a window, if “Stay in the menu bar when the window is closed” is on and you have finished the setup guide.
Using it from Mac startup
Turn on “Launch at login to the Mac” and “Stay in the menu bar when the window is closed” under “Integration” in Settings, and at login the app starts in the menu bar without opening a window. A banner at the top right of the screen tells you for a few seconds that it has started. You can open the window by clicking the banner or with “Open Window” from the menu bar icon.
Troubleshooting
 Shizuku
The first run is slow because the model is being converted.
The first transcription takes a long time to finish
With Whisper, the first time only, the model is converted for this Mac, which takes from a few minutes to about 10 minutes. Progress is shown on screen, so please wait. After that it takes much less time.
The live “Whisper” engine does not start right away
The Whisper engine takes a few seconds to start, and 1–3 minutes the first time right after installing or updating. Recording has already started, and once it is ready, what you said until then is also transcribed. If you want to start right away, choose “Mac built-in” (Mac標準) (macOS 26 or later).
The “Mac built-in” engine is not available
“Mac built-in” speech recognition (as the file transcription engine and as the live engine) is available on macOS 26 or later. Earlier versions of macOS use Whisper.
Dictated text does not go in at the cursor (“Copied” (コピーしました) is shown)
Without Accessibility permission, the text is only copied to the clipboard. Press “Allow…” (許可する…) under “Dictation” in Settings and turn on Whisper Local in the list in System Settings. Once it is on, the status in Settings changes to “Allowed” (許可されています). If it does not change after turning it on, remove Whisper Local from the list with “−”, add it again with “Allow…”, turn it on and restart the app. If you switch to another app while speaking, the text is also only copied.
Styles that use AI cannot be chosen, or the text goes in as “Tidy”
Styles that use AI are available on Macs with macOS 26 or later and Apple Intelligence turned on. When they are not available, the reason is shown under “Dictation” in Settings. When the app judges that the AI result strays from what you said, it also types the “Tidy” text instead of the AI result and shows the reason on the band. If the AI result is skipped again and again, rewrite “How the AI tidies the text” (AIへの清書のしかた) in Settings to be shorter and more specific, or press “Reset to Default” (初期値に戻す).
Dictation does not start when I press ⌥End
If another app uses the same key, it cannot be registered. The reason is shown under “Dictation” in Settings, so specify a different key. The key stops working when you quit the app, so it is a good idea to turn on “Stay in the menu bar when the window is closed”.
The microphone cannot be used
Live transcription needs microphone permission. If you did not allow it the first time, or revoked it later, turn on Whisper Local under “Privacy & Security” → “Microphone” in macOS System Settings.
The number of speakers or the assignments are wrong
Speaker labels are estimates. They can be wrong for short acknowledgments or where people speak at the same time. If you know the number of people in the conversation, specifying it with “Number of speakers” (人数) under “Speakers” in Settings reduces mix-ups. You can also correct assignments in “Review Segments and Times”.
The dictionary replaces words I don’t want changed
The dictionary replaces words without considering context. Do not register homophones where either word could be correct. Before you edit the text, you can go back to the result before replacement with “Undo Replacements” (置き換え前に戻す) in the result window. Unchecking “Enabled” (有効) on a dictionary line stops replacement for that word only.
I want to transcribe audio longer than 2 hours
Each file can be up to 2 hours long. Split longer files.
I was asked to check something when saving subtitles
If there are unconfirmed segments, or segments with times that are reversed, overlapping, out of range or over the seconds limit, the app asks you to check instead of exporting silently. In “Review Segments and Times”, correct and confirm the times of segments that show “Review and Confirm” (確認して確定), then save.
The window does not open at login
When “Stay in the menu bar when the window is closed” is on, the app stays in the menu bar at login without opening a window. You can open it by clicking the banner at the top right of the screen or with “Open Window” (ウインドウを開く) from the menu bar icon.
If this does not solve the problem, please email info@k386.sub.jp.
Glossary
| Model | Data used to turn speech into text. It is downloaded once at first from Hugging Face |
|---|---|
| Whisper | A speech recognition model released by OpenAI. This app uses versions converted for Core ML by Argmax |
| Core ML | The macOS framework for running machine learning models on the Mac |
| Hugging Face | The site that distributes the models |
| Engine | The recognition method that turns speech into text. For file transcription (“Engine” (変換エンジン) in Settings) and live transcription, you choose “Whisper” or “Mac built-in” for each |
| Segment | A unit of the transcription result, split by time. It corresponds to one subtitle |
| Speaker labels | A feature that estimates who is speaking and splits the text by speaker |
| SRT, VTT, SBV | File formats used for video subtitles |
| Keychain | The macOS feature for storing passwords and similar items |
| 127.0.0.1 | The address that means “this Mac itself”. Integration accepts connections only from this address |