
icRec User Guide
Choose a storage folder and register your recorder, and you are ready. Add transcription, summaries and other integrations when you need them. Screens show fictional data.
App interface: Japanese. Japanese labels are shown in parentheses, for example Settings (設定).
Not sure? Hover over the “?” in the app.

PART 1
Getting started
For the big picture, see the app's tutorial. On first launch icRec shows illustrated slides on what it does, the ways recordings come in, the everyday flow, and how to prepare Whisper Local and AI (Apple Intelligence or Codex), and shows whether this Mac is set up. Open it again from the Help menu, “チュートリアル” in the sidebar, or the top of Settings.
Not sure what something does? Look for “?”. Settings and buttons that may be unclear have a small “?” to their right. Hover over it to see what the item is for, what happens when you use it and what to prepare first (the explanations are in Japanese). Click it to keep the explanation open; click again or anywhere else to close it.
Choose a storage folder
First, decide where on your Mac audio and text will be saved.
- Open Settings (設定) in the sidebar.
- Under Storage (保存先), use “Choose the Mac folder” (Mac側の保存先を選ぶ).
A folder is created per recording, keeping its audio, transcript, summary and so on together. Renaming a recording never moves its files.
Moving it would need a migration, so keep using the folder you chose first.
Register your recorder
- Connect the IC recorder over USB and make sure it appears as a disk in Finder.
- In Settings → Import sources (取り込み元), press “Register folder” (フォルダを登録).
- Choose the folder that contains your recordings, such as REC_FILE or VOICE on SONY models. It differs by model, so pick the actual folder.
icRec remembers the disk's identifier. A different device that merely has the same disk name is not treated as the same recorder. The first time icRec reads the recorder, macOS asks for access to removable volumes.
PART 2
Basics
Import
Import manually
- From a registered recorder: Settings → Import sources → “Import” (取り込む)
- By choosing files: the import button in the toolbar, or ⌘I
Import automatically on connection Under Settings → Resident mode and auto import (常駐と自動取り込み), each option can be turned on separately.
- Resident mode (常駐する): on by default. icRec keeps running in the background after you close the window and waits for your recorder (resident mode and menu bar).
- Auto import: when a registered recorder connects, icRec comes to the front and copies only new recordings. Works only in resident mode.
- Auto eject: only after every file was copied and verified. If Spotlight or Finder is still reading the recorder right after it was connected, icRec tries again a few times, and shows whether it was ejected, or why not, in Activity, the completion message and the notification. It never forces removal.
- Notifications: start, completion and problems of automatic imports. macOS asks for permission the first time.
How your files are protected
- Files are copied to a staging folder and verified by SHA-256 before being saved.
- Recordings already imported are not copied again. If the copy on your Mac is missing, it is restored from the recorder.
- Files on the recorder are never modified. They are removed only if you turn on “Remove imported audio from the recorder” below, and only once their copy on your Mac is verified.
- Starting an import clears finished jobs from the Activity list (recordings and texts are kept).
Remove imported audio from the recorder (optional)
If recordings keep piling up on the recorder, it runs out of space and every connection has more files to check. Turn on “接続時に、前回までに取り込み済みの音声をレコーダーから削除する” (Remove audio imported earlier from the recorder when connecting) for a recorder under Settings → Import sources, and icRec tidies the recorder up each time you import. It is off by default, and icRec asks before turning it on.
- When you connect the recorder and import (automatically or with the Import button), icRec first removes the audio imported on earlier connections.
- Then it imports the new recordings. What is imported now stays on the recorder until the next connection.
- Only audio imported from that recorder and folder, unchanged since, and with the same content (checked by SHA-256) in your storage folder is removed.
- Audio whose copy on the Mac is missing or different, audio rewritten on the recorder, and audio of recordings you deleted in icRec are kept. Folders and non-audio files are never removed.
- Audio that could not be removed stays on the recorder and is shown in Activity. A removed recording shows when it was removed under “Source file and date evidence”.
The copy in your storage folder stays. If you want to keep recordings on the recorder too, leave this off.
Resident mode and the menu bar
- In resident mode, click the icRec icon in the menu bar to show or hide the window. In the background, icRec disappears from the Dock.
- Right-click (or Control-click) the icon for Show, Import, Settings, Check for updates, About icRec, User guide and Quit.
- Choose what closing the window does: ask every time, keep running in the background, or quit. “Don't ask again” remembers your choice.
- “Open icRec at login” (ログイン時に icRec を起動する) starts it in the background when you log in (off by default).
- To quit the app, use the icon's right-click menu or icRec → Quit icRec.
- macOS may hide the icon, for example when the menu bar is full. You can still show the window by opening icRec again from the Applications folder, and check icRec under System Settings → Menu Bar → “Allow in the Menu Bar”.
Record with your Mac's microphone (voice memos)
When your recorder isn't at hand, record with your Mac's microphone and handle the memo like any imported recording. Off by default.
- In Settings, turn on “Record voice memos with the Mac's microphone” (Macのマイクでボイスメモを録音する). Voice Memos (ボイスメモ) appears in the sidebar.
- Choose a microphone. “System default” (システムの既定) follows the input selected in System Settings.
- On the Voice Memos screen, press “Start recording” (録音を開始). Press again to stop and save. ⇧⌘R also starts and stops.
- Memos are saved to the Recordings list as “ボイスメモ yyyy/MM/dd HH:mm” with the “Macで録音” tag, dated when recording started. Recordings imported from a recorder get the “ICレコーダー” tag.
- Once connected to Whisper Local, each memo is transcribed after it is saved.
- If no sound reaches icRec from the chosen microphone (it sends only silence), a warning “「microphone」から音が届いていません” (No sound from the microphone) appears while recording. Stop and choose another microphone under “マイク” (Microphone). A silent memo is saved but not transcribed.
- macOS asks for microphone access the first time. If you declined, allow icRec in System Settings → Privacy & Security → Microphone. The microphone is used only between starting and stopping a recording.
- If the microphone is disconnected while recording, what was recorded is saved. If icRec quits while recording, the memo is recovered at the next launch.
Also record the other side of a Zoom meeting
Turn on “会議などを録音する” (Record meetings and the like), choose the app, and icRec takes that app's sound directly and records it together with your voice from the microphone, in one recording. Unlike picking up the speakers with the microphone, the other side's voices come through at their original quality. Requires macOS 14.2 or later.
- Open your meeting app, such as Zoom, and join the meeting.
- On the Voice Memos screen, turn on “会議などを録音する” (off by default; normally only the microphone choice is shown).
- Put on earphones or headphones. Because two sources are recorded at once, earphones are required.
- Under “録音するアプリを選んでください” (Choose the app to record), choose the meeting app. It appears in the list by itself once you join the meeting.
- Press “Start recording” (録音を開始). The first time, macOS asks for “System Audio Recording” permission; allow it.
- Only the chosen app's sound is recorded. Notification sounds and other apps are left out.
- When you stop, icRec measures how loud your voice and the other side are and levels them automatically before saving. Long recordings take a little while to save.
- With speakers, the other side's voices also reach the microphone and are recorded twice. Always listen with earphones or headphones.
- If the other side's sound didn't come through, icRec tells you after saving. If you declined permission, turn on icRec under System Settings → Privacy & Security → Screen & System Audio Recording → “System Audio Recording Only”.
- Tell the other participants before you record a meeting.
The same tips appear on screen when the option is on. After you close them with “わかりました” (Got it), they stay in the ⓘ next to “会議などを録音する”.
- The meeting app isn't listed: apps appear once they start handling sound, so one that has just opened may be missing. Join the meeting and the list updates by itself (↻ refreshes it too). To prepare before the meeting, play a sound once, for example with Zoom's Settings → Audio → Test Speaker. For meetings in a browser such as Google Meet, choose that browser (Chrome, Safari and so on). If it still isn't listed, reopen the meeting app.
- “音を受け取れません” (Can't receive the sound) and recording doesn't start: join the meeting so you can hear the others, then press Record again. If you reopened the meeting app, choose it again in the list.
- “相手の音が入っていませんでした” (The other side's sound wasn't recorded) after recording: check the “System Audio Recording Only” permission, and that the meeting app wasn't muted or at zero volume.
Import iPhone voice memos
Recordings made with Voice Memos on iPhone can be imported automatically once iCloud has synced them to this Mac. Off by default.
Preparation
- On both iPhone and Mac, turn on Voice Memos in iCloud settings with the same Apple Account. If the Mac's Voice Memos app shows your iPhone recordings, syncing works.
- In System Settings → Privacy & Security → Full Disk Access, turn on icRec (add it from the Applications folder with “+” if it isn't listed). “Open Full Disk Access settings” (フルディスクアクセスの設定を開く) in icRec's Settings opens this pane.
- Quit icRec and open it again.
Using it
- In Settings, turn on “Import iPhone voice memos automatically” (iPhoneのボイスメモを自動で取り込む).
- Choose whether to import only recordings that arrive from now on, or everything already in Voice Memos too.
- The option can't be turned on until a storage folder is chosen; use “Mac側の保存先を選ぶ” shown in the panel first.
- While icRec is running it checks every 30 seconds and imports up to 3 recordings at a time. Recordings still syncing from iCloud are imported once they arrive.
- Imported recordings appear with the name you gave them on iPhone and the “iPhoneボイスメモ” tag, or “iPhoneボイスメモ yyyy/MM/dd HH:mm” if the name can't be read. The recording date is the time it was recorded on iPhone.
- Once connected to Whisper Local, they are transcribed after import.
- Voice Memos recordings are only read, never changed or deleted. Recordings you delete in icRec, or rename on iPhone, are not imported again. Deleting on iPhone does not remove them from icRec.
- Newer recordings (.qta) are imported by converting their AAC audio to m4a. Recordings that can't be converted are listed in Activity; export them from Voice Memos and import the file instead.
- While the option is off, “Check access” (読み取りを確認) tells you whether the permission is in place.
icRec reads just the Voice Memos recording list and audio, keeps everything on your Mac and sends nothing anywhere. If the permission is lost (for example after reinstalling icRec), grant it again.
Import AI MindClip recordings
Recordings made with SwitchBot AI MindClip and uploaded to SwitchBot's cloud can be imported automatically. Off by default.
Syncing MindClip to your phone and uploading to the cloud are done by the AI MindClip app on your phone. icRec takes over from there: when a recording appears in the cloud, it imports it automatically. Recordings not yet synced on your phone don't reach icRec.
Preparation Install the AI MindClip app on your phone and check that your MindClip recordings appear in it. Choose a storage folder in icRec's Settings first.
- In Settings, in the “マインドクリップの録音を自動で取り込む” (Import MindClip recordings automatically) panel, press “QRコードでログイン” (Sign in with QR code).
- Scan the QR code with the AI MindClip app on your phone and approve the sign-in there.
- Once signed in, turn the option on and choose whether to import only recordings that arrive from now on, or everything already in the cloud too.
- While icRec is running it checks every 5 minutes and imports up to 3 recordings at a time.
- Imported recordings appear with the name MindClip gave them and the “マインドクリップ” tag, or “マインドクリップ yyyy/MM/dd HH:mm” while they have no name yet. The recording date is when recording started on MindClip.
- Once connected to Whisper Local, they are transcribed after import. MindClip's own transcripts and summaries are not imported.
- Recordings in the cloud are only read and downloaded, never changed or deleted. Recordings you delete in icRec are not imported again.
- If the sign-in lapses, the panel and the sidebar say so; sign in again with the QR code. “ログアウト” (Sign out) removes the sign-in from this Mac and stops importing.
icRec receives the audio the same way AI MindClip Web (the browser version) does, so it may stop working without notice if SwitchBot changes it. The sign-in (a sign-in token, not your password) is kept in the Mac's keychain.
Import HiDock recordings from HiNotes
Recordings and whispers (short voice notes) made with HiDock and synced to HiNotes can be imported automatically. Off by default.
Reading recordings off HiDock is done by the HiNotes app on your computer, which uploads them to the HiNotes cloud. HiNotes allows only one sign-in at a time, so using the HiNotes app signs icRec out. After the transfer, sign in again in icRec with “HiNotesにログイン” (Sign in to HiNotes); icRec then imports the new recordings automatically.
- In Settings, in the “HiNotesの録音を自動で取り込む” (Import HiNotes recordings automatically) panel, press “HiNotesにログイン” (Sign in to HiNotes).
- On the HiNotes page that opens inside icRec, enter your email address and password, complete the image check and sign in.
- Turn on “HiNotesの録音を自動で取り込む”.
- While icRec is running it checks HiNotes for new recordings and whispers every 5 minutes and imports them with the “HiNotes” tag. The recording date is the one recorded in HiNotes, and the name is the one HiNotes gave.
- Only audio is imported. With transcription on, icRec transcribes it (with Whisper Local). Recordings in HiNotes are never changed or deleted.
- icRec does not store your password. Only if you choose “このMacにメールアドレスとパスワードを記憶する” (Remember email and password on this Mac) on the sign-in page are they kept in the Mac's keychain to fill in next time. Remove them any time with “記憶したログイン情報を削除” (Delete remembered sign-in) in Settings.
- HiNotes allows only one sign-in at a time. Signing in with the HiNotes app signs icRec out; sign in again with “HiNotesにログイン”.
icRec receives the audio the same way the HiNotes web version does, so it may stop working without notice if HiDock changes it.
Recording dates
The calendar shows recordings whose date is confirmed. By default, a date is confirmed automatically when:
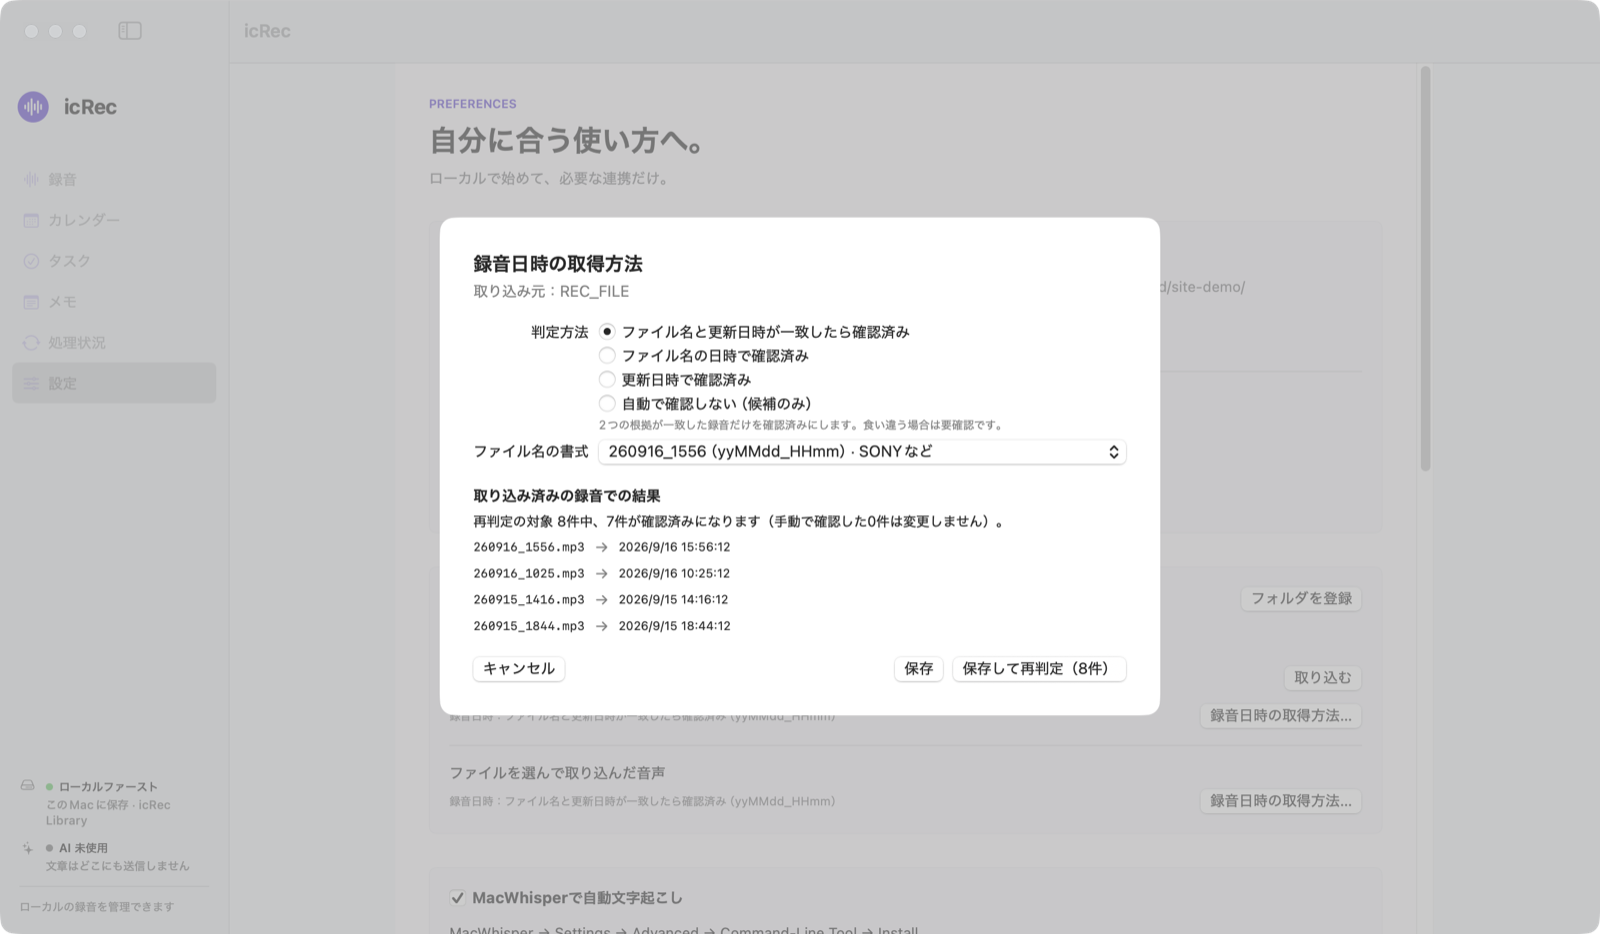
Example: if 260916_1556.mp3 was modified at 2026-09-16 15:56:56, the recording date becomes 15:56:56.
Otherwise the recording shows “Check date” (日時を確認) and appears in the calendar's “Check dates” list. Open it, choose Edit (編集), enter the date, turn on “I checked this date” and save. A file's modification time alone is never treated as the recording date.
Match the rule to your recorder Each row in Settings → Import sources has “How to get the recording date…” (録音日時の取得方法…). Files you choose directly have their own setting.
| Rule | What it does |
|---|---|
| Confirm when file name and modification time agree | Default. Confirms only when both sources match. |
| Confirm from the file name | Doesn't check the modification time. A wrong device clock gives a wrong date. |
| Confirm from the modification time | For recorders without dates in file names. On some models this is the end of recording or the copy time. |
| Don't confirm automatically | Shows a suggestion only; you confirm each recording. |
- Pick a file-name format such as
yyMMdd_HHmm(SONY and others) oryyyyMMdd_HHmmss, or enter a custom one. yyyy/yyyear,MMmonth,ddday,HHhour,mmminute,sssecond (optional). Symbols match as-is; quote letters, as in'REC'_yyyyMMdd_HHmm. Matching starts at the beginning of the name; trailing parts such as_01are ignored.- “Save” applies from the next import. “Save and re-check” also applies the rule to that source's recordings. Dates you confirmed or edited yourself are not changed.
Home and dashboard
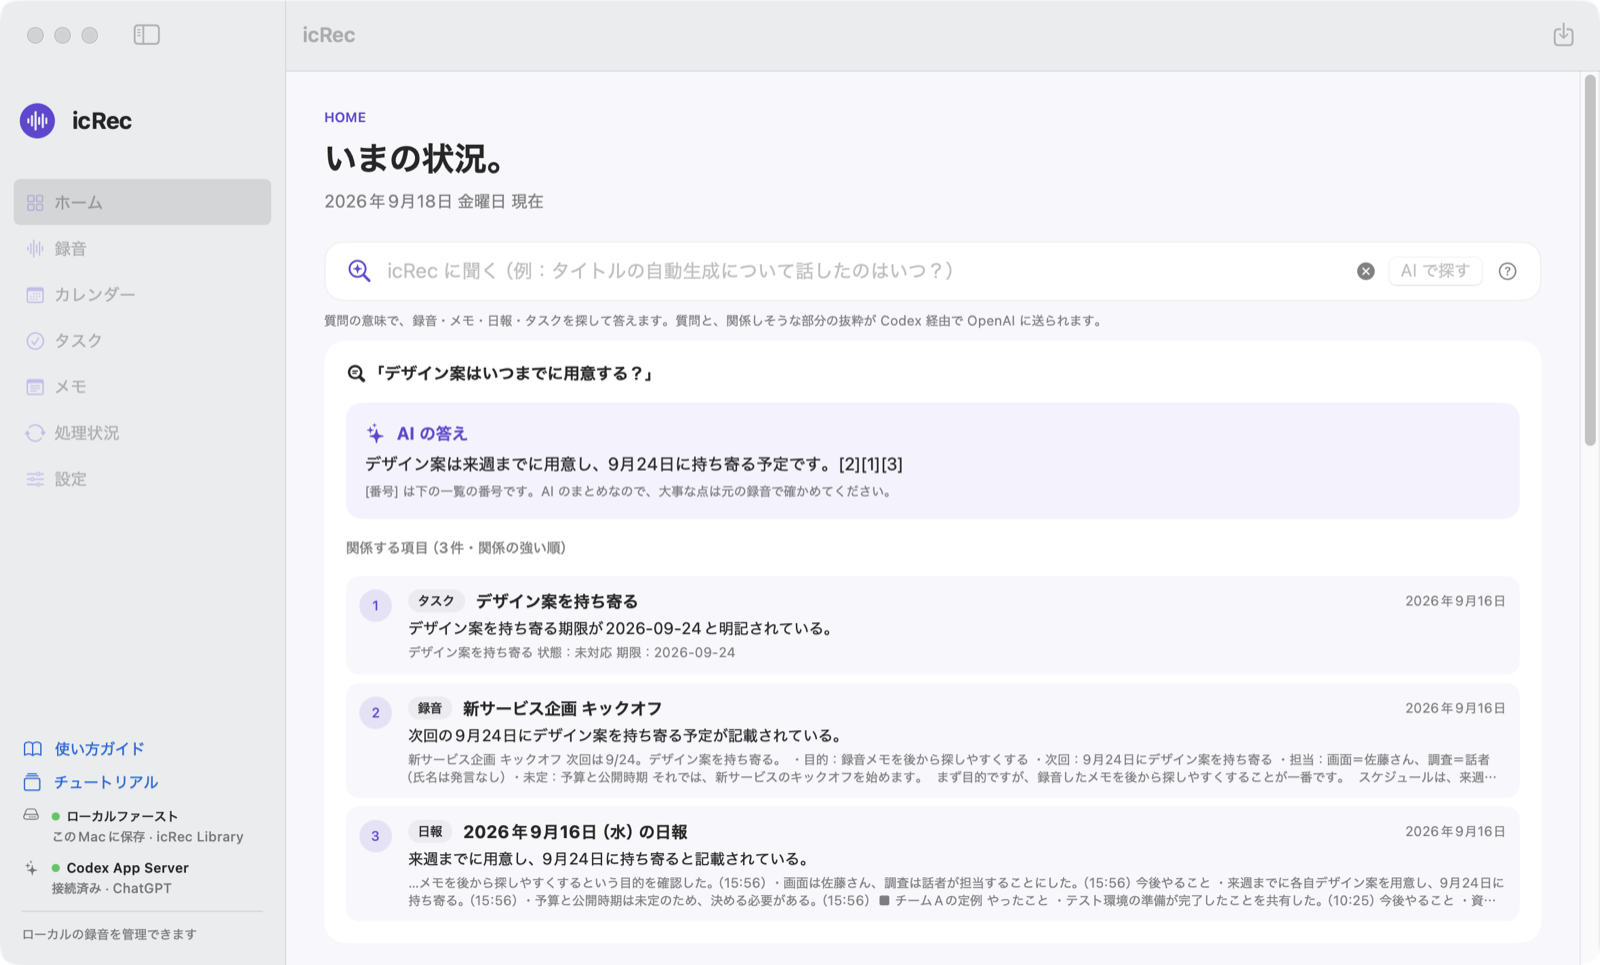
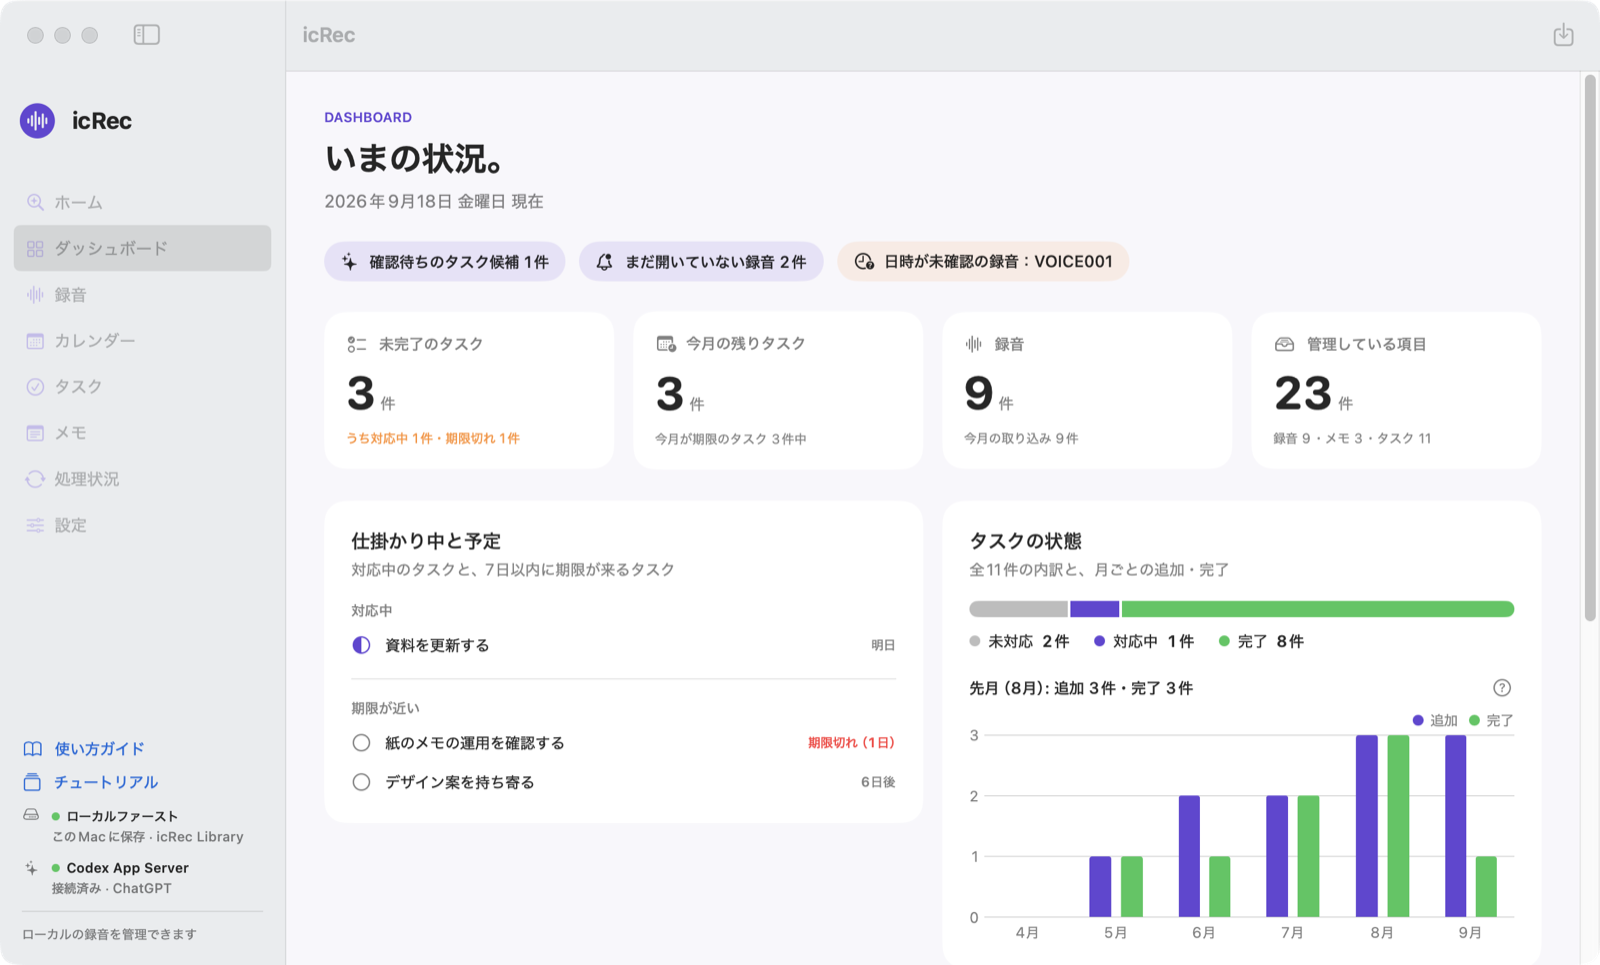
icRec opens on Home (ホーム). Ask “icRec に聞く” (Ask icRec) in the middle and the answer and related items appear. Try one of the example questions, and see notices below. Where your recordings and tasks stand is on the dashboard (ダッシュボード) in the sidebar.
- Notices: shown only when there are task suggestions to review, unopened recordings, recordings with unconfirmed dates or running jobs. Click one to go there.
- Counts: unfinished tasks (in progress and overdue among them), tasks left this month, recordings (imported this month), and managed items (recordings, notes and tasks).
- In progress and upcoming: tasks in progress and tasks due within 7 days (including overdue), shown as “today”, “in 3 days” or “overdue (1 day)”.
- Task status: the share of open, in-progress and done tasks, and a chart of tasks added and completed each month over six months including this one.
- Latest recordings and notes: newly imported recordings and recent notes. Click to open them.
Dates when tasks were added and completed are recorded from 0.1.18. Earlier tasks are placed on the chart by estimating from their source text's date or last update, and the chart says so.
Ask icRec (AI search) Ask in plain words in the search box on Home (for example “When did we talk about generating titles automatically?” or “When are the design proposals due?”). Even when the words differ, icRec finds recordings, notes, daily reports and tasks with a similar meaning and answers.
- The AI's answer is on top and related items below, most relevant first. [1] and so on in the answer are the item numbers; click an item to open it.
- “AI への指示” (Instruction for AI) under the search box offers slides, a mind map or an infographic besides an answer. Slides (a cover and 4–8 pages) export as PDF; mind maps and infographics as PNG images. Any of them can be saved to Notes or copied as text with their sources. After a result, choosing another instruction remakes it from the same question.
- How it works: the AI widens the question into search terms (only the question is sent), icRec searches on your Mac, and only excerpts of up to 20 candidates are sent to the AI to write the answer. The whole library is never sent. An answer takes about 10–30 seconds.
- “Ask icRec” needs Codex or an API key. When neither is chosen under AI, Home becomes “icRec で探す” (Search icRec) and searches by keyword (nothing is sent). It also searches by keyword while another AI job is running.
Play and edit
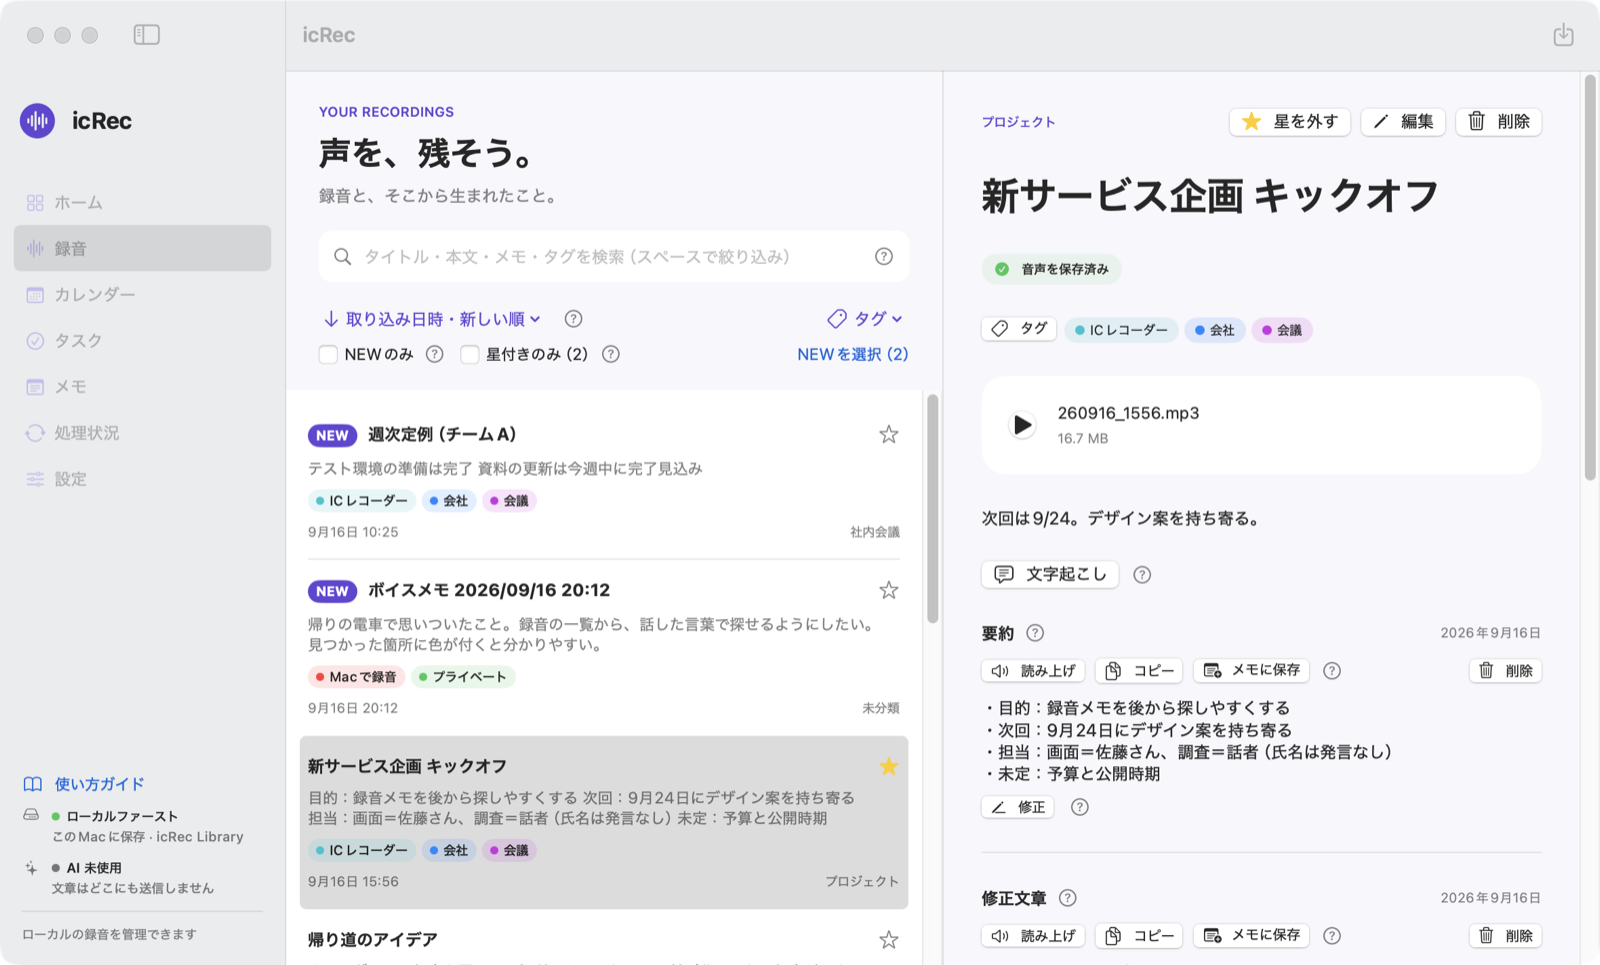
Choose a recording under Recordings (録音) to see its details on the right. The list and details open at half width each; drag the divider to adjust (double-click to reset).
- Press the play button to play the audio.
- Star recordings you want to come back to with “Star” or the ☆ in the list. “Starred only” shows just those.
- Click the title twice to rename in place. Return confirms; Esc cancels.
- Edit (編集) changes the title, folder (category), memo and recording date.
- “ひとこと残す” (Add a note) adds a note linked to the recording.
- “Source file and date evidence” shows the original file name, how the date was decided and when it was imported.
- Each text has Copy and “Save to Notes” (メモに保存).
- Each text's Delete removes only that text, such as a duplicate summary or a failed transcript. The recording and other texts stay; the file moves to the Mac's Trash.
- Recordings still named as imported (for example “260916_1556”, “ボイスメモ 2026/09/18 10:30” or an iPhone name) get a title that fits their content the first time you use AI on them (summaries, tidy-up and tasks).
Read aloud Press “読み上げ” (Read aloud) next to a transcript, summary or note and a reader opens and starts reading. Sentences appear one by one in large type, the current one highlighted. Click a sentence to read from there; Space pauses and resumes, Esc closes. Choose the voice and speed in Settings. It uses the voices on your Mac, so it needs no internet or fees and sends no text anywhere. English words in Japanese text may sound unnatural.
Correct text by hand
Fix homophone errors or a summary's nuance by hand. This works for original transcripts, revised texts, summaries and so on (not for Google Docs copies, which follow the Google side).
- Press “修正” (Correct) under a text and edit it. Return adds a line break.
- “Save correction” (⌘S) saves; Esc cancels.
The first time you correct a text, the previous version is kept. Compare with “修正前を見る” (Show before correction) and go back any time with “修正前に戻す” (Restore). Later summaries, tidy-ups and task extraction use the corrected text.
Search, sort and batch processing
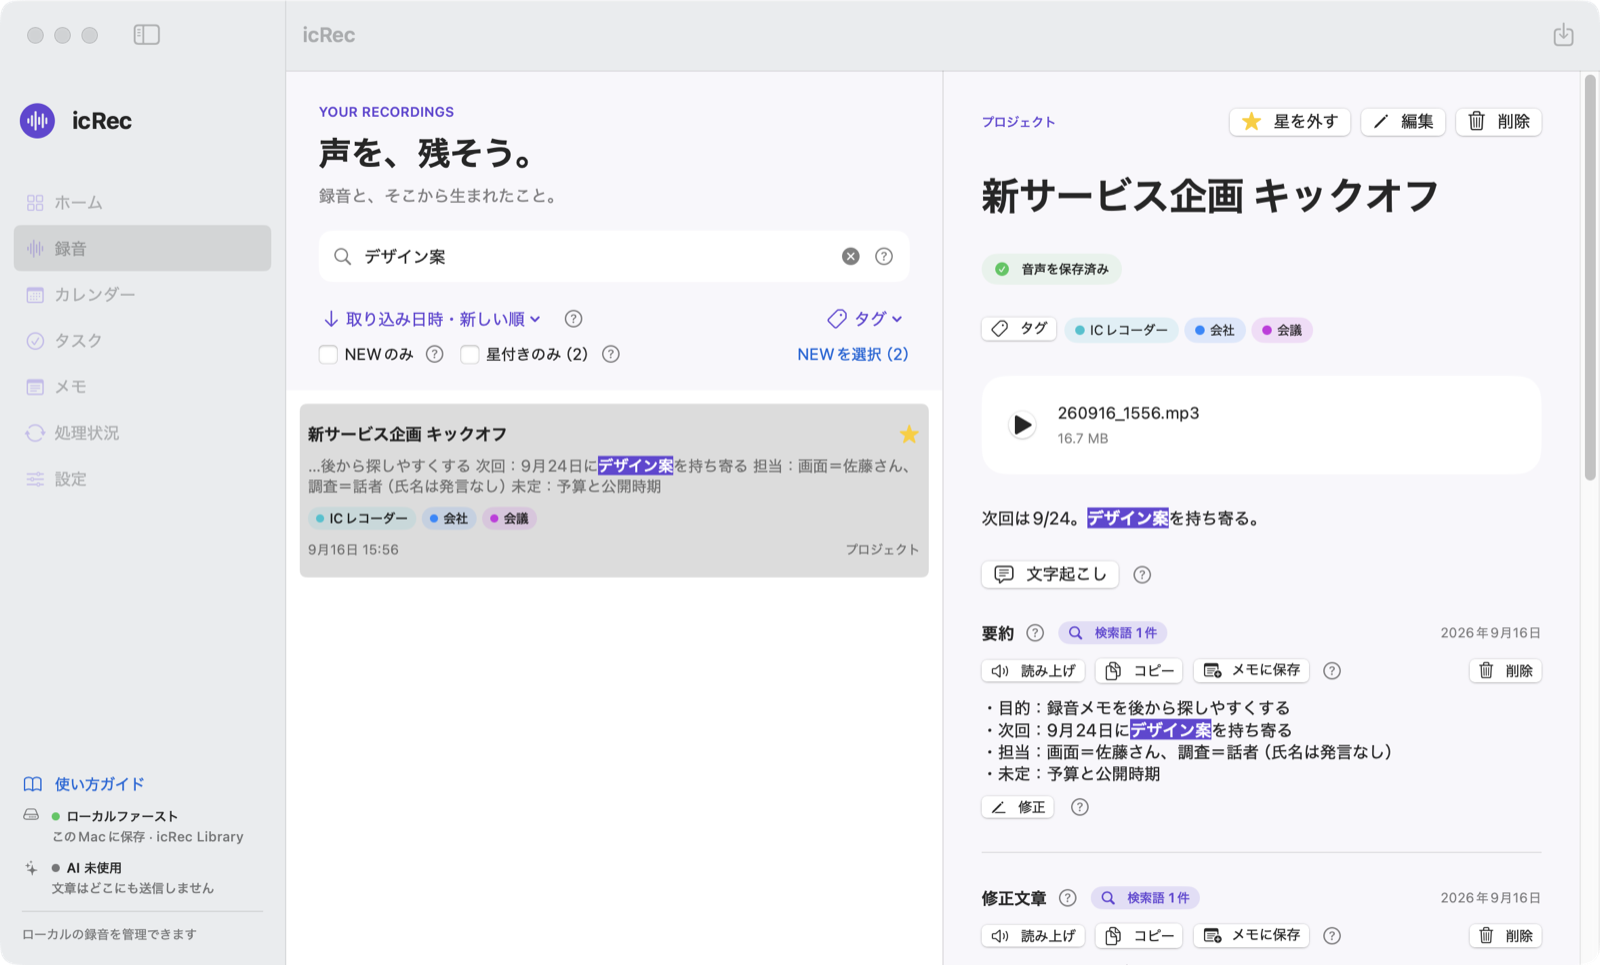
- What the list shows: up to two lines of the summary, note or transcript under each title. While searching, the text around the match is shown.
- Search: titles, notes, folders and original file names, plus the text of transcripts, summaries and revised texts, and tag names. Case and full/half-width characters are ignored. Separate words with spaces (full-width spaces work too) to find recordings containing all of them.
- Open a recording while searching and matches in its texts are highlighted, with “search term: n” in each text's heading.
- If nothing is found, icRec shows whether “NEW only”, “Starred only” or tag filters are also applied, with buttons to clear them.
- Sorting and NEW: sort by import date, recording date or title, ascending or descending. Newly imported recordings get “NEW”, which clears when you open them or after 7 days. “NEW only” filters, and “Select NEW” selects them all.
- Batch processing: ⌘-click or ⇧-click several recordings to open the batch panel (also in the right-click menu): transcribe, summarize, tidy up, find tasks, save audio to Drive, clear NEW, add tags or delete. Recordings are processed one by one, skipping those already done. Press Stop in the sidebar to stop.
Tags
- Tag recordings, tasks and notes. “プライベート”, “会社”, “会議” and “電話打ち合わせ” (private, company, meeting, phone call) are ready from the start.
- Choose from the Tag button at the left of the tag row, or type a name to create one. You can tag several selected recordings at once.
- Tags on a recording carry over to tasks made from it and texts saved to Notes.
- Filter with each screen's Tag menu. With several tags chosen, items having all of them are shown.
- “タグを管理…” (Manage tags…) adds, renames, recolors, merges and deletes tags.
Delete and restore recordings
- Delete from the recording's details, the list's right-click menu or the batch panel. Check what will be deleted with it, and how many, in the confirmation.
- The audio file and the recording's texts (transcript, summary, revised text and so on) are deleted together. Tasks and notes made from it are deleted only if you choose “Also delete tasks and notes”.
- Deleted recordings stay in “Recently Deleted” above the list for 30 days; “Restore” brings them back with their data. After that, or with “Delete permanently”, their files are moved to the Mac's Trash.
- Even if the same recording is still on the recorder, it is not imported again. Undo this under “Audio not to import again” in Recently Deleted.
- Audio, events, Docs and Tasks sent to Google stay there. Delete them in Google if needed.
Transcription (Whisper Local)
Transcription uses Whisper Local, a free app running on the same Mac (Apple silicon Mac, macOS 14 or later). Everything happens on this Mac; audio never leaves it.
Get Whisper Local
- Download the DMG from the Whisper Local page and drag “Whisper Local” to Applications. Update the same way when a new version is out (prepared models and settings are kept).
- Prepare a model under Whisper Local's Settings → Models. “Large v3 Turbo” is recommended.
Connect it to icRec (one confirmation)
- Choose a storage folder under “保存先” (Storage) in icRec's Settings first.
- At the top of “文字起こし” (Transcription) in Settings, press “Whisper Local と連携する” (Connect to Whisper Local).
- Whisper Local asks “「icRec」と連携しますか?” (Connect with icRec?). Check the folder it will read (icRec's storage folder) and the requesting app, then press “連携する” (Connect).
That sets everything up for you: resident mode, the allowed folder, the app registration and request acceptance in Whisper Local, and the client ID, token and folder ID in icRec. Transcription is turned on. Nothing needs to be copied by hand (needs Whisper Local 0.3.15 or later).
- Without Whisper Local, Settings says it is needed for transcription. Get it with “Whisper Local を入手” (Get Whisper Local), open it once, press “インストールしたので確認する” (I installed it), then connect.
- If icRec says your Whisper Local doesn't support automatic connection, update Whisper Local to the latest version.
- Once connected, the same place offers “接続を確認” (Check connection) and “連携し直す” (Connect again). Connect again after changing the storage folder.
- To set it up by hand instead, open “手動で設定する(詳細)” (Set up manually) and enter the client ID, token and folder ID registered in Whisper Local's Settings → Integrations (the port is normally 8769).
- With “start Whisper Local in the background when icRec starts” on, you don't need Whisper Local to open at login (Whisper Local 0.3.14 or later).
- Leave “文字起こしの言語” (Transcription language) at the default “日本語” (Japanese) for Japanese recordings. Choose a model or follow Whisper Local's setting. Output can be TXT, CSV, SBV, SRT or VTT.
- When on, new recordings are transcribed automatically. To transcribe one yourself, press “文字起こし” (Transcribe) in its details. Pressing it again on a transcribed recording asks first (the existing transcript and what was made from it are kept).
- Recordings over two hours are split at pauses automatically, sent in parts, and joined into one transcript. The recording stays as one.
- Lines such as “ご視聴ありがとうございました” (Thanks for watching) that appear in silent or noisy parts are removed from the transcript automatically.
- “未完了を一括文字起こし” (Transcribe all pending) in Activity transcribes untranscribed recordings one by one, oldest first. Stop pauses it; next time only the rest is processed.
- Keep Whisper Local running while transcribing. Speaker identification needs a speaker model in Whisper Local (it slows processing). Speaker labels are never turned into real names.
- The token is kept in the Mac's keychain, not in the settings file. When connecting, it is handed over only inside this Mac and never put in a URL. MacWhisper settings from 0.1.30 or earlier are not carried over; connect as above.
Summaries, tidy-up and task extraction (AI)
Under “AI 機能” (AI) in Settings, choose one: “使わない” (None), “Apple Intelligence”, “Codex(ChatGPT)” or “API キー・LM Studio” (API key / LM Studio). Without AI, importing, transcription, keyword search, tags and tasks all still work.
| What you can do | Apple Intelligence | Codex (ChatGPT) | API key / LM Studio |
|---|---|---|---|
| Summarize, tidy up, find tasks | Yes | Yes | Yes |
| Tidy up automatically after transcription | Yes | Yes | Yes |
| “Ask icRec” on Home (answers, slides and more) | — | Yes | Yes |
| Daily report | — | Yes | Yes |
| Text sent | None (processed on your Mac) | Excerpts to OpenAI | Excerpts to the company you choose (LM Studio sends nothing) |
| Cost | Free | Paid ChatGPT plan | Pay-as-you-go API charges (LM Studio is free) |
- Apple Intelligence: available on Apple silicon Macs with macOS 26 or later when Apple Intelligence is on. Your Mac's own AI does the work and no text leaves the Mac. Tidying up long texts takes longer than with Codex. If it can't be used, the sidebar shows why in orange.
- If Apple Intelligence summarizes a passage during “文章を整える” (Tidy up) instead of tidying it, the passage is tried once more; if it is summarized again, it is kept as it was so nothing you said is lost. Activity shows how many passages were kept.
- Codex (ChatGPT): needs a paid ChatGPT plan (Plus, Pro, Business and so on) and the ChatGPT app (or the Codex app or Codex CLI) on this Mac, signed in with your ChatGPT account. The executable is found automatically; if not, choose it with “実行ファイルを選択…” (Choose executable…). “Codex とは?” (What is Codex?) in Settings lists what you need.
- API key: enter an API key from OpenAI (ChatGPT, Codex), Anthropic (Claude) or Google (Gemini) under “API の設定” (API settings) in Settings. It does everything Codex does, without installing Codex. Create the key in the company's console (Settings opens the page); it is kept in the Mac's keychain. “保存して確認” (Save and check) verifies the key and lists the models it can use, and you pick a model from that list (no text is sent). Usage is billed at each company's API rates, separately from plans such as ChatGPT.
- LM Studio (local LLM): with LM Studio on this Mac and a model downloaded, choose “LM Studio(ローカル)” under the same “API の設定”. “接続を確認” (Check connection) lists the models; pick one. With “LM Studio を自動で起動する” (Start LM Studio automatically, on by default), icRec starts LM Studio's server when icRec starts and, just before a summary or other work, loads the chosen model if it isn't loaded (a large model takes tens of seconds). A model icRec loads is unloaded after an hour unused, freeing memory. Open LM Studio once beforehand (that installs the lms command icRec uses). With the option off, or with the server URL on another machine, start the server and load a model from LM Studio's Developer tab. It is free and no text leaves the Mac (if you point the server URL at another machine, text goes there). The model must support structured (JSON) output; small models may not manage it.
- The sidebar shows which AI is in use (green when ready). Without Codex, an API key or LM Studio, Home becomes “icRec で探す” (Search icRec, keyword search), and “AI を使うには?” (How to use AI) explains both and opens Settings.
Apple Intelligence (the AI on your Mac) can handle only a limited amount of text at once, so on long recordings Summarize, Tidy up and Find tasks may fail partway, take a long time, or leave some parts as they were. Retry failed items from Activity. If you often work with long meetings or seminars, choosing Codex (ChatGPT) or an API key is recommended. Transcription (Whisper Local) works regardless of recording length.
In a recording's details, press “要約する” (Summarize), “文章を整える” (Tidy up) or “タスクを洗い出す” (Find tasks) under a text. Notes have the same buttons.
- Results are added to the same recording as a summary or revised text; the original is kept. From a note, the result is saved as a new note.
- “Find tasks” lists suggestions under the text. Check the ones you want and press “選択したタスクを追加” (Add selected tasks). Each task links back to its source text.
- “Tidy up” fixes particles, punctuation and paragraphs without changing the content. Fillers like “えーと” and “あー” and hesitations like “なんだっけ” are removed (genuine uncertainty such as “〜かもしれない” is kept).
- Turn on “文字起こしのあと、自動で「文章を整える」” (Tidy up after transcription) in Settings to tidy up each transcript as soon as it is done. When several recordings come in together, all are transcribed first, then tidied up one by one. Transcripts already tidied up and very short ones are skipped.
- Register words transcription keeps getting wrong under “置換リスト” (Replacement list) in Settings (for example “クロードコード” → “Claude Code”). Hiragana/katakana, full/half-width and case are ignored; “試しに変換” (Try it) shows the result.
- Recordings still named as imported get a fitting title (up to 40 characters) the first time you use AI on them. It comes in the same AI response, so no extra usage. The original title stays under “Source file and date evidence” and can be restored.
With Apple Intelligence, nothing is sent. With Codex or an API key, the text you press a button for (plus your replacement list for Tidy up, or each transcript when tidying up automatically) is sent to the AI's provider (OpenAI via Codex, or the company you chose for the API key); Codex uses your ChatGPT usage and an API key is billed by usage. With LM Studio, the text is processed on your Mac and nothing is sent. Audio is never sent. AI output can contain mistakes, so check names, numbers and decisions against the original.
If an AI job fails, Activity shows the reason Codex or the API returned, such as a usage or credit limit, a dropped connection or text that is too long. If Codex is signed out, sign in to Codex and press “再接続” (Reconnect). If an API key has stopped working, enter it again under “API の設定”.
Calendar and daily reports
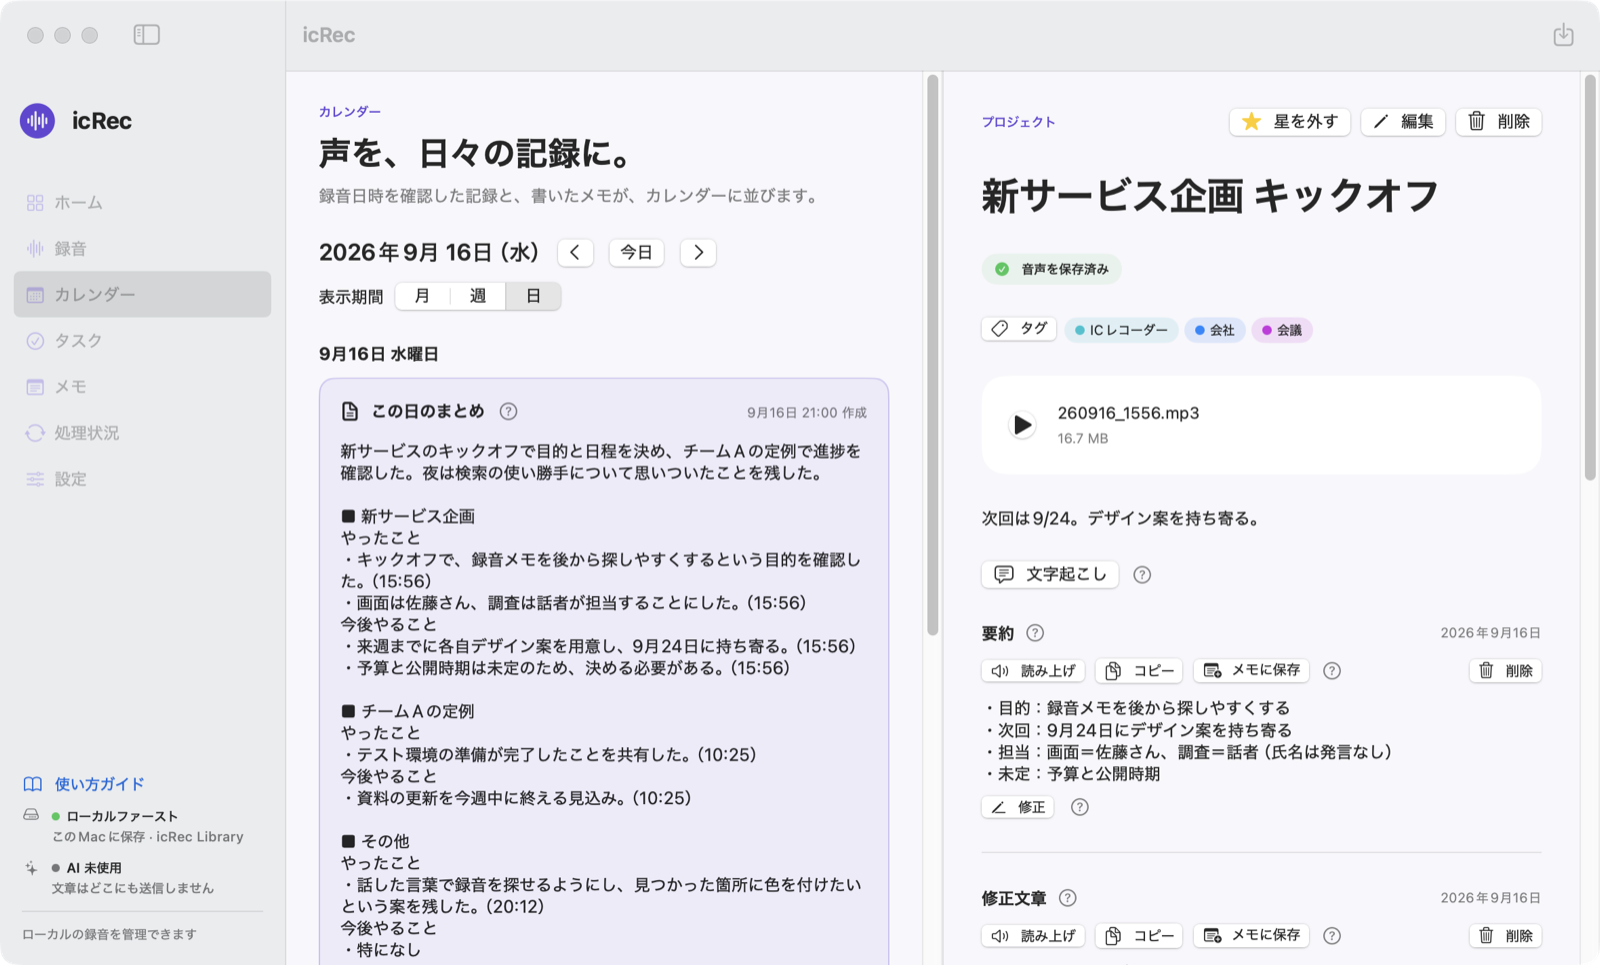
- The calendar (カレンダー) shows recordings with a confirmed date and notes written on the Notes screen, by day.
- It opens in the day view on the selected day (today right after launch). Move with the arrows and “Today”, and switch to month or week.
- Click a recording or note to open its details or the note on the right. Recordings without a confirmed date collect under “Check dates” below.
Summary of the day (daily report) Even on busy days, see what you did as a daily report without opening each recording. Available when Codex (ChatGPT) or an API key is chosen under AI (not with Apple Intelligence).
- In the day view, press “この日の録音をまとめる(n件)” (Summarize this day's recordings) under the date.
- The AI reads the day's transcripts and shows the summary in place.
- An overview comes first, then for each piece of work, “what was done” and “what comes next” as bullet points, each ending with the time of its recording (for example 15:56).
- Recordings with a confirmed date and a transcript are used. Tagging recordings (for example with a project name) helps group them.
- The summary is also saved to Notes with a name like “2026年9月16日(水)の日報” and can be edited. “まとめ直す” (Summarize again) replaces it with a fresh one after confirming.
- After summarizing, press “タスクを洗い出す” (Find tasks) to have the AI find to-dos in the summary. They are listed under it with checkboxes; “選択したタスクを追加” (Add selected tasks) puts them in Tasks (the same summary in Notes shows them too).
- The day's transcripts are sent to the AI's provider (OpenAI via Codex, or the company you chose for the API key). Audio is never sent.
Tasks and notes
Tasks
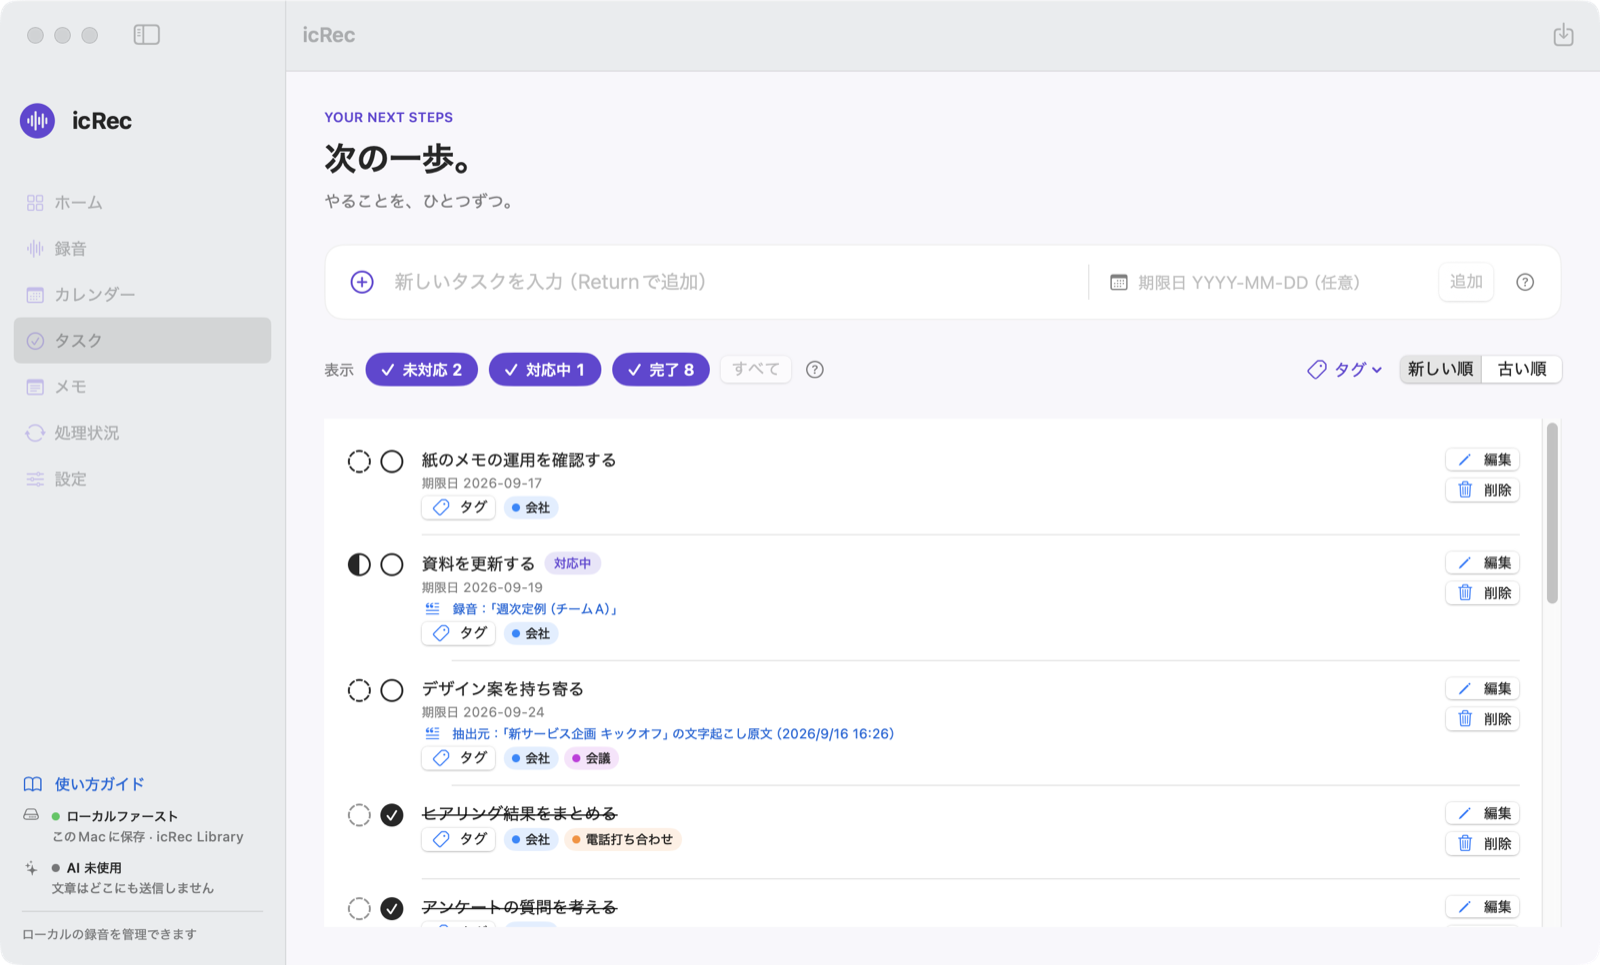
- Type a title and an optional due date (YYYY-MM-DD) above the Tasks list and press Return or “追加” (Add). Click the circle to complete a task.
- The dotted circle to its left marks a task in progress (対応中); completing it clears the mark. The mark is icRec-only and not sent to Google Tasks.
- Filter by open, in progress or done under “表示” (Show), and sort newest or oldest first.
- Edit changes the title, due date and note later. Delete removes duplicates or mistakes (cannot be undone).
- Task suggestions found by AI become tasks only after you review the evidence and choose “タスクに追加” (Add as task) or “見送る” (Skip).
Notes
- Keep words on the Notes screen (メモ) even on days without a recording. Save with ⌘Return or “メモを保存” (Save note); Return adds a line break.
- Summaries and revised texts copied with “Save to Notes” are managed here too. Editing a note doesn't change the recording's text.
- Search, filter by tag, edit and delete notes. Notes written on the Notes screen also appear on the calendar on the day you wrote them.
Activity
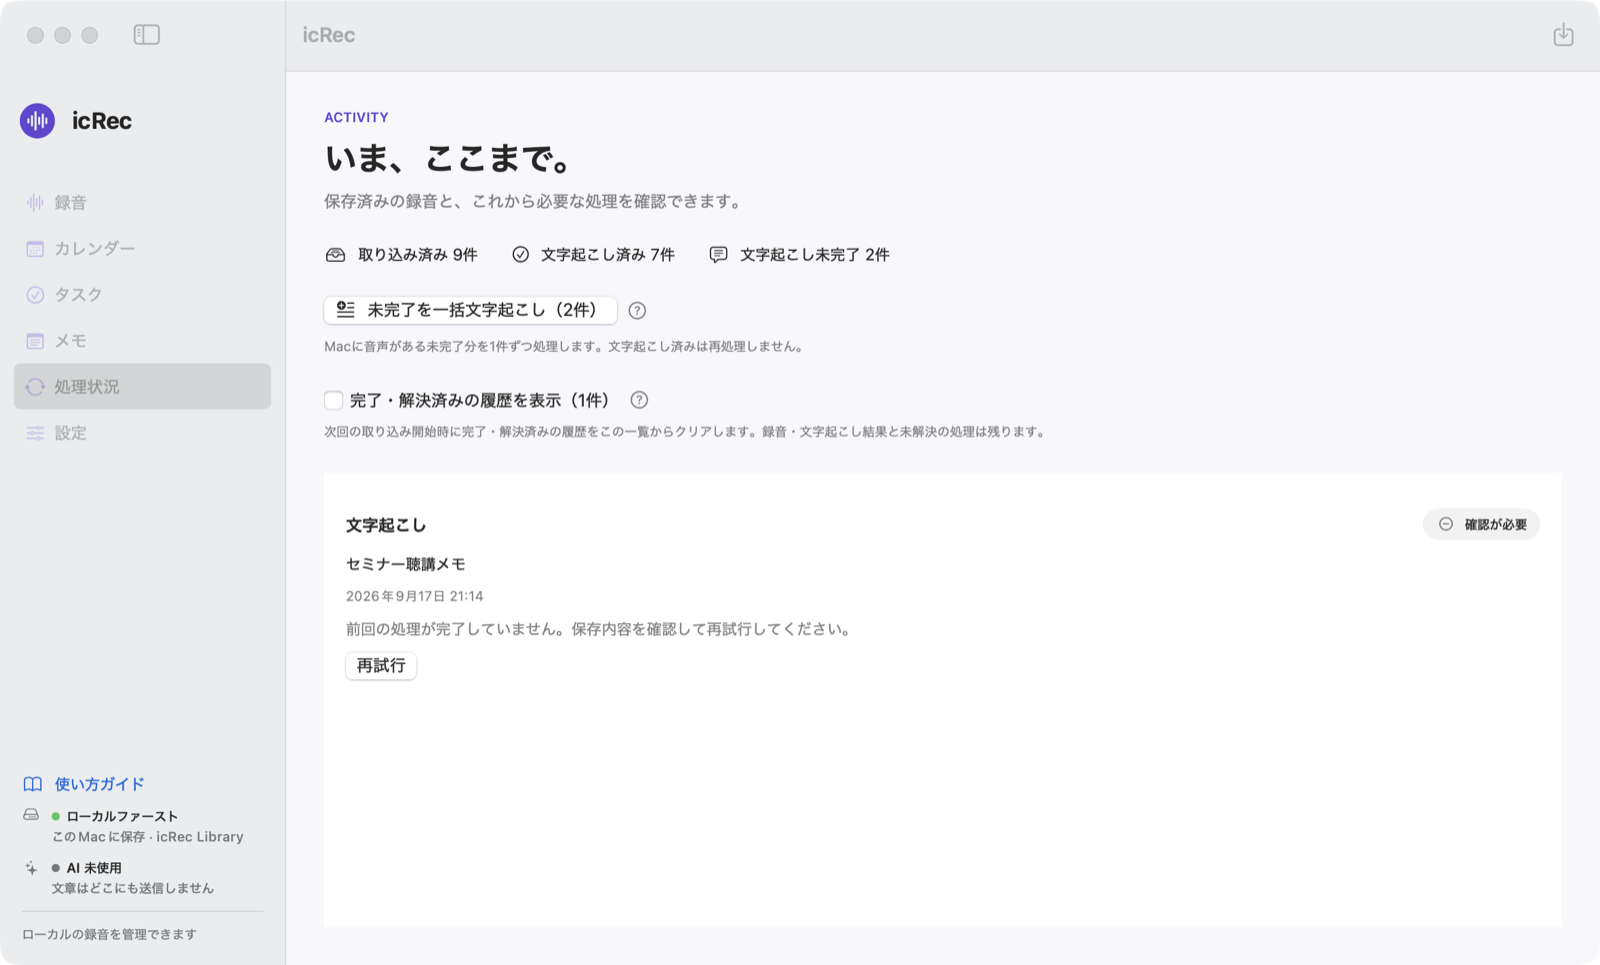
- See counts of imported, transcribed and pending recordings, and jobs that need attention. Normally only running, waiting and unresolved jobs are shown.
- While importing or transcribing, the current recording, the count (for example “2 / 5”) and progress are shown. The same progress appears at the bottom of the sidebar; click it to open Activity.
- With iPhone voice memo or AI MindClip import on, their panels show the last check, how many were imported, why reading failed, and “今すぐ確認” (Check now).
- Retry failed transcriptions with “再試行” (Retry); rerun AI or Google jobs from their item. Failures later fixed by a retry become “resolved” and appear under “完了・解決済みの履歴を表示” (Show completed and resolved).
- “片付ける” (Dismiss) removes a failure you no longer need from the list; it stays in the history as dismissed. Recordings and texts are unchanged.
PART 3
Settings
The table of contents at the top of Settings (“設定の目次”) jumps to each section: storage, import sources, transcription, tags, Google and more. It stays visible while you scroll and highlights the section you are looking at.
Use only the Google services you need: Drive, Docs, Calendar and Tasks. Off by default.
- Under Settings → Google (Google連携), check the services to use.
- Press “Googleに接続” (Connect to Google) and review the account and permissions in the browser. While Google's verification is in progress, you may see “Google hasn't verified this app”.
- For Calendar or Tasks, choose where to send with “接続を確認・送信先を取得” (Check connection and get destinations).
Connecting alone sends no audio, text or tasks. No Google Cloud setup or credential JSON is needed.
| Action | What happens |
|---|---|
| Save audio to Drive | Saved to an icRec folder, checked by size and SHA-256. The audio on your Mac stays. |
| Export text to Google Docs | The chosen text becomes its own document. Changes made in Docs come back as a separate “Google Docs copy” and never overwrite the original. |
| Add the recording day to Calendar | A confirmed recording date becomes an all-day event. No attendees are added. |
| Add or sync with Google Tasks | Title, note, due date and completion. Due times are not handled. If both sides changed, nothing is overwritten and the change is held. |
- If authorization expires or is revoked, Settings shows “Googleに再接続” (Reconnect to Google). Reconnect with the same account to continue with linked data.
- “Googleとの接続を解除” (Disconnect Google) deletes the token saved on this Mac. Revoke the app's access that remains in Google from your Google account settings.
Managing with your own Google Cloud (optional)
Not normally needed. Only if, for example, your company wants to use an OAuth client (the registration used to sign in to Google) from its own Google Cloud project.
- In Google Cloud, enable Drive API, Docs API, Calendar API and Tasks API as needed.
- Create the OAuth consent screen. For “External”, set the publishing status to “In production” (in “Testing”, Google requires reconnecting every 7 days).
- Create a “Desktop app” OAuth client and save the JSON.
- Under Settings → Google, open the advanced settings for your own Google Cloud, turn on using your own OAuth client, and choose the JSON with “認証設定JSONを読み込む…”.
Status indicators
The bottom of the sidebar shows the storage and AI status, with both color and text.
| ローカルファースト (Local first) | Ready to save to your storage folder. Orange when no storage folder is set. |
|---|---|
| AI 未使用 (AI not used) | “使わない” (None) is chosen under AI. No text is sent anywhere. |
| Apple Intelligence · このMacで処理 · 送信しません (on this Mac, nothing sent) | Apple Intelligence is ready (green). If it can't be used, the reason (unsupported Mac, turned off, still preparing and so on) is shown in orange. |
| Codex App Server · 接続済み (connected) | Shows the account type and model in use. |
| OpenAI API / Claude API / Gemini API / LM Studio | The AI used with an API key or LM Studio. Shows whether a key is saved (for LM Studio, whether a model is chosen) and the model in use; orange when not set up. |
| 接続中/AI処理中 (connecting / AI working) | Checking the connection, or running a summary, tidy-up or task extraction. |
| 未接続 (not connected) | The integration is on but not connected. The reason is shown. |
| iPhoneボイスメモ/マインドクリップ | Shown only when automatic import is on but recordings can't be read (permission lost, sign-in expired and so on). |
Click the AI status or the iPhone voice memo / AI MindClip indicator to open Settings.
Updates
When a new version is published, “アップデートがあります” (Update available) appears at the bottom of the sidebar. Click it to read the release notes and press “アップデートして再起動” (Update and restart). icRec then:
- Downloads the new version (you can cancel).
- Checks the file's checksum, Apple notarization and the publisher's (K386) signature.
- Quits, replaces itself with the new version and restarts. Recordings, text and settings are kept.
- It checks at launch and once a day. To check now, use icRec → “アップデートを確認…” (Check for updates…) or “今すぐ確認” (Check now) under Settings → Updates.
- Turn automatic checks off under Settings → Updates.
- Updating is not possible while importing, transcribing, or running AI or Google jobs. Try again when they finish.
- If icRec runs from outside the Applications folder (Downloads or the DMG) or its location isn't writable, it can't replace itself. Use “ダウンロードページを開く” (Open the download page) and replace it by hand.
- Version 0.1.0 has no update feature; replace it from the download page.
Move to a new Mac
icRec automatically keeps a copy of your recording list, titles, dates, tags, texts and tasks in the “library-backup” folder inside your storage folder.
- Copy the whole storage folder to the new Mac.
- In icRec on the new Mac, choose that folder as the storage folder.
- When “別のMacのライブラリの控えがあります” (A library copy from another Mac was found) appears, press “取り込む” (Import).
iCloud is not used. Recordings already made on the new Mac are kept and merged, and the state before importing is backed up. Under Storage in Settings you can see when the copy was last saved and check copies from other Macs.
PART 4
Troubleshooting
Most of the time, the reason is shown in Activity or in the Settings panel. Check there first.
 Ren
RenThe reason is usually shown in Activity.
Recordings aren't imported automatically when I connect the recorder
Check that icRec is running (not quit) and that both resident mode and auto import are on. To keep waiting after a restart, turn on “Open icRec at login”. Recorders whose disk identifier couldn't be read when registered are not imported automatically (shown as “自動識別不可・手動で確認”); press Import instead.
The recording date stays “Check date”
The file name doesn't match the format, or the modification time disagrees. Choose the right format under “How to get the recording date…” and press “Save and re-check”. Recordings that still can't be decided can be confirmed by hand with Edit.
The recorder isn't ejected automatically
If some audio failed to import or the recorder changed during import, icRec doesn't eject for safety. If another app is using the disk, ejecting may fail even after several tries. The reason appears in Activity, the completion message and the notification; check it, then eject in Finder.
Transcription fails
Use “接続を確認” (Check connection) in Settings to see whether icRec reaches Whisper Local. If it doesn't, or you changed the storage folder, press “連携し直す” (Connect again) and then “連携する” (Connect) in Whisper Local to set everything up again. If you set it up by hand, check that Whisper Local is running with resident mode and request acceptance on, that the allowed folder is icRec's storage folder, and that the chosen model is prepared. If “the allowed folder was moved or replaced” appears after restarting the Mac, update Whisper Local to 0.3.12 or later. The audio stays saved, and you can retry from Activity.
Codex can't connect or shows “not signed in”
Check that “Codex(ChatGPT)” is chosen under “AI 機能” (AI) in Settings, sign in to your ChatGPT account in the ChatGPT app (or Codex), then press “再接続” (Reconnect). If the executable isn't found, use “Codexを自動検出” (Find Codex) or “実行ファイルを選択…” (Choose executable…). Even at the usage limit, the original is kept.
AI jobs (summaries, daily reports and so on) fail
Activity shows the reason Codex returned. For the usage limit, wait or check your plan's usage; for too many requests or busy servers, wait a little; for text that is too long, reduce the input and try again. Failures you won't retry can be removed with “片付ける” (Dismiss). If tidying up a long recording with Apple Intelligence failed with “Failed to parse generated content.”, update to 0.1.52 or later and retry it from the Activity list.
Can't connect to Google
Check the account and permissions you allowed in the browser and press “Googleに接続” again. To change services, disconnect first and connect again. If a keychain access prompt appears for an icRec item, choose “Always Allow”.
Search doesn't find a recording
Check that “NEW only” or tag filters aren't also applied; the no-results message has buttons to clear them. Words separated by spaces show only recordings containing all of them. Text search covers recordings whose transcript or summary is done.
Voice memos can't record
Check that icRec is allowed under System Settings → Privacy & Security → Microphone. If the chosen microphone isn't connected, the system default is used until it is. Choose a storage folder in Settings before recording. If “音が届いていません” (no sound) or “録音に音が入っていませんでした” (the recording had no sound) appears, that microphone is sending silence; choose another one (such as the Mac’s built-in microphone) under “マイク” on the voice memo screen and record again.
iPhone voice memos aren't imported
The Settings panel shows the reason. For “読み取れません” (can't read), allow icRec under Full Disk Access and reopen icRec. If it still can't read with Full Disk Access on, remove icRec from the list and add it again. If the “waiting for sync” count doesn't go down, check that the recording plays in the Mac's Voice Memos app (downloaded from iCloud). If you chose “only recordings that arrive from now on”, earlier ones are not imported.
AI MindClip recordings aren't imported
The Settings panel shows the reason. For “ログインが切れています” (signed out), sign in again with “QRコードでログイン”. The QR code expires in about two minutes; press “QRコードを作り直す” (Make a new QR code) if it does. Changes on SwitchBot's side may also have stopped it.
HiNotes recordings aren't imported
HiNotes allows only one sign-in at a time, so signing in with the HiNotes app signs icRec out. Sign in again with “HiNotesにログイン”. If you chose to remember your email and password, only the image check and “Log in” are needed. Changes on HiDock's side may also have stopped it.
The summary of the day button is missing or disabled
Switch the calendar to the day view. Only recordings with a confirmed date and a transcript can be summarized. Daily reports need Codex. If “日報のまとめには Codex が必要です” (Daily reports need Codex) appears, check what you need with “Codex とは?” (What is Codex?) and choose “Codex(ChatGPT)” under AI in Settings. The button is disabled while imports or AI jobs are running.
Hovering over “?” shows nothing
Keep the pointer still for a moment (about 0.3 seconds). If it still doesn't appear, click “?”. Transparent windows of other apps (such as a dictation app's overlay) can block the pointer.
Audio doesn't play
Check that the storage folder (for example on an external disk) is connected. Some formats can't be played by macOS.
The menu bar icon doesn't appear
macOS may hide the icon when the menu bar is full. Open icRec again from the Applications folder to show the window, and check icRec under System Settings → Menu Bar → “Allow in the Menu Bar”.
If this doesn't help, write to info@k386.sub.jp.
PART 5
Glossary
- Storage folder
- The folder on your Mac you chose for audio and text. It holds a folder per recording and the library copy (library-backup).
- Import source
- Where recordings are imported from: registered recorder folders, plus a setting for files you choose directly.
- Recording date (confirmed)
- The date settled as when the recording was made. Only confirmed recordings appear on the calendar.
- Original transcript
- The untouched text from Whisper Local. Summaries and revised texts never overwrite it.
- Revised text
- The text made easier to read with Tidy up, saved separately from the original.
- Whisper Local
- K386's free app that transcribes on the same Mac. icRec tells it where the recording file is and receives the text.
- Apple Intelligence
- Apple's AI built into Apple silicon Macs (macOS 26 or later). With it, icRec makes summaries and so on entirely on your Mac.
- Codex
- A tool for using OpenAI's AI from your computer. icRec asks for summaries and so on through the Codex on your Mac, using your paid ChatGPT plan's usage.
- Full Disk Access
- macOS permission to read files in protected places. icRec uses it only to read iPhone voice memos.
- Keychain
- Where macOS keeps passwords and similar secrets. icRec stores sign-in tokens there.
- Eject
- Making a connected recorder safe to unplug from your Mac.
- SHA-256
- A fingerprint-like value computed from a file's content. Any difference gives a different value, so it is used to check that a copy is correct.